From the Main Menu, Project Accounting\Project Accounting\Maintenance\Projects\Copy Project, Jobs
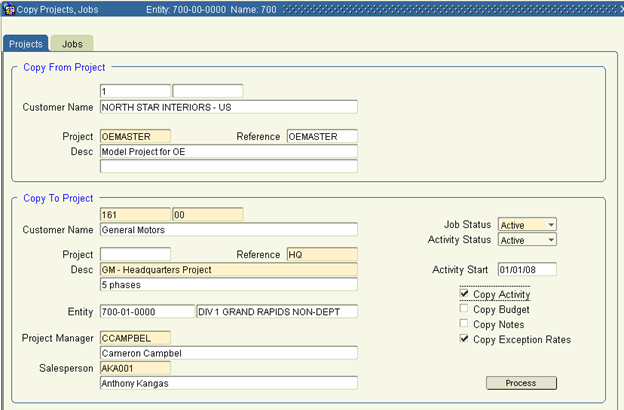
1. Type the necessary information in each field (or select the entry from the LOV) in the Copy From block. Tab to move from field to field.
Project Select the model project you want to copy from using the  .
.
2. Type the necessary information in each field (or select the entry from the LOV) in the Copy To block. Tab to move from field to field. (If there's no LOV, leave that field blank.)
Customer |
This field displays the same customer specified in Customer in the Copy From block. You must enter a new customer name here or choose one from the LOV. For GSA/Direct, select the customer that you're doing the GSA/Direct business with. This enables you to have access to the correct information for Customer and Ship-To entries when placing orders in the Sif Wizard. |
Project |
Leave blank to enable the system to auto-assign a number. |
Reference |
Follow the naming convention that references the location for this project (i.e., the street address - as found in the Loc Ref for this customer's entry in the Contacts Mgmt. module). |
Description |
There are two lines containing 30 characters each. Name your project accordingly. This information does print on reports, order confirmations and invoices. (Example: BROW/GC Rev Rm 218/0201= Broward County Commissioners/ Government Center, Revenue, Room 218/February, 2001) |
Entity |
Using the LOV, select the appropriate sales entity for this project. |
Project Manager |
Enter the ID of the person assigned as project manager. |
Salesperson |
Enter the ID of the person assigned as the salesperson. |
Job Status |
Leave as Active. |
Activity Status |
Leave as Active. |
Start Date |
Leave blank to enable the system to assign the current date as the start date, or enter another date. (This field must contain a date prior to the date that time is first entered against this project.) |
3. Check the appropriate boxes:
Copy Exception Rates This enables exception rates to be copied from the Copy From project.
Copy Activity/Task Structure Only activities that exist in the Copy From project/job will be included in this process. New starting dates may be entered for each of the activities copied.
Copy Budget
Copy Notes
4. You may click Process to complete the copy. The system will prompt you when the project is being copied. Click OK.
5. When prompted that the project was copied successfully, click OK.
6. Exit the screen.
Optional Processing
Khameleon allows you to copy specific Jobs related to a Model project. This may be used in a case of a service only project that you do not wish to have all jobs copied. To do this click the Jobs tab and follow these instructions:
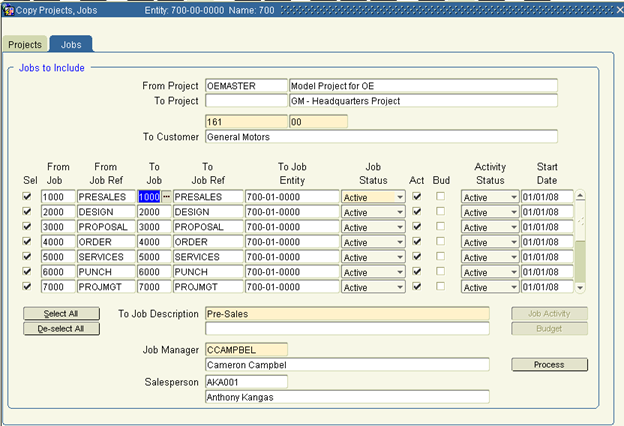
The following information may be modified when copying jobs to the new project
Sel |
Check or un-check the ‘Sel’ box to determine which jobs get copied to the new project. |
To Job |
You may modify the Job number that is assigned to the new project/job. |
To Job Ref |
You may modify the Job Ref or Short name associated with the new job. |
To Job Entity |
The sales entity associated with a specific job may be modified from the default value assigned on the Project tab. |
Job Status |
The status of a specific job may be changed here. |
Act |
Uncheck the box if you do not want Activities copied from the Copy From Project. |
Bud |
If you wish to change the setting as to whether Project Budgets are copied from a Copy From Project, you may change this here on a Job basis. |
Activity Status |
Change the default Activity Status here. |
Start Date |
You may modify the default Start Date of activities on a particular job. |
Select All |
If you've changed the selection, pressing this button will re-select all Jobs to be copied. |
De-select All |
Pressing this button will de-select all jobs from being copied. |
To Job Description |
You may modify the description of a job by highlighting the job in question and modifying it here. |
Job Manager |
The Project Manager defaults from the Project tab. If a different manager will be responsible for a particular Job, you may change it. |
Salesperson |
If the Salesperson on a Job is different, change it here. |
7. You may click Process to complete the copy. The system will prompt you when the project is being copied. Click OK.
8. When prompted that the project was copied successfully, click OK.
9. Exit the screen.Click Process when all changes have been made.
Query the newly created project
Once you've created a project, you may view this Project information. Then notify the individual(s) who requested the project.
After completing the process above, go to Distribution\Orders Entry\Maintenance\Projects\Project Job Master
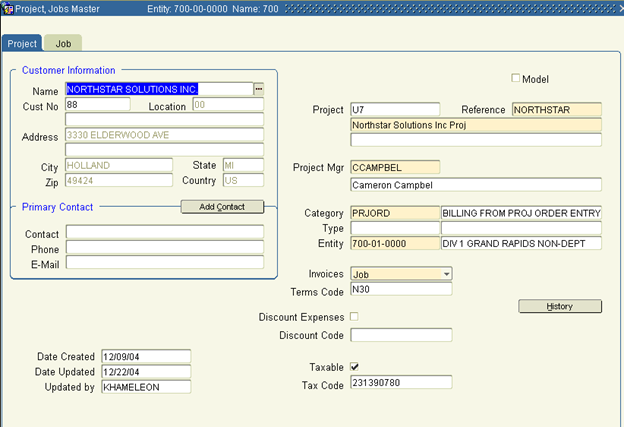
1. Get into query mode.
2. Place your cursor in Project. Enter the Project Number you have created. Execute the query.
3. Exit the screen.