This process is used to enter the receipt of goods ordered for each location. Purchase Orders must be entered and printed before you can receive against them.
From the Main Menu, go to Distribution/Purchase Order/Processing/Process PO Receipts.
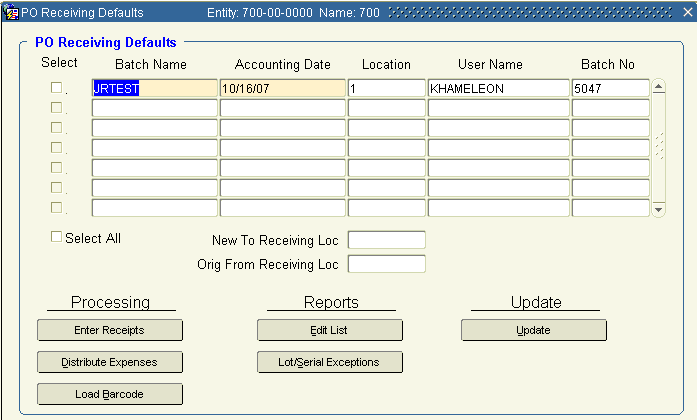
1. Once in the PO Receiving Defaults screen), begin a new record.
2. In Batch Name, enter a user defined batch name.
3. Accounting Date should contain the current date or fiscal date you want this PO applied to. Backdating is not allowed once a month is closed.
4. In Receiving Loc, use the LOV to select the receiving location for which you are entering receipts. (Each batch may include only one receiving location.)
5. Click Enter Receipts.

6. Now that you've entered the Purchase Order Receiving screen, populate the fields as indicated:
PO No Enter (or select from the LOV) the purchase order against which the product is being received. (a PO can only be received in one open receiver batch at a time. If you can't find the PO they are trying to receive against, it may already have been chosen in a previous receiver batch that has not yet been updated/posted.)
Receipt Date Date the product arrived at your warehouse.
Document Enter the document number (most likely the FO#) found on the packing slip (receiver) from the vendor.
Acctg Date Reflects the current date.
Vendor Name and Number These populate based upon the PO selected
Exclusive for Order Number If this PO is tied to an order, the order number is displayed.
Customer Name If this PO is exclusive to an order, the customer name of that order is displayed.
Auto Back Order Fill This box should be checked by default. If you wish the product to be placed into inventory, uncheck the box.
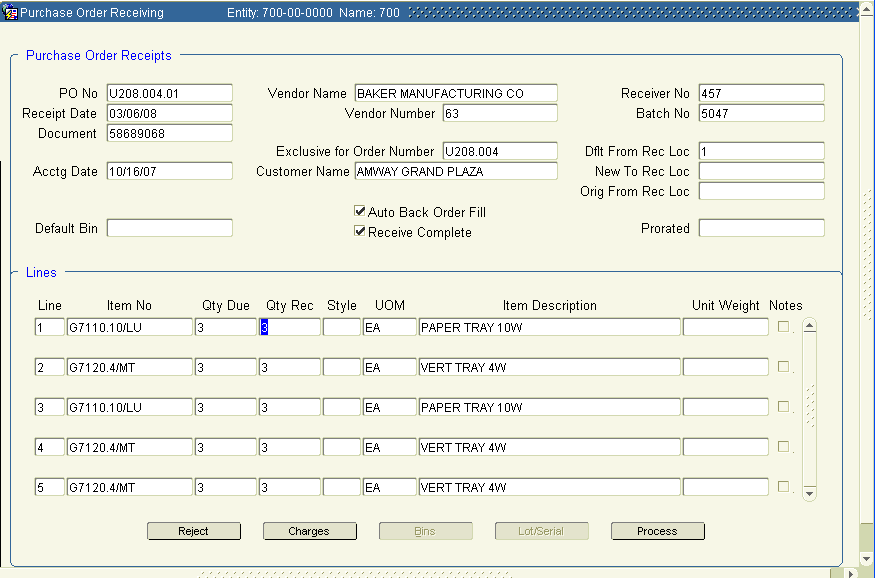
Receive Complete May be checked by default. This box will allow remaining quantities to be received to default. Edits may be made for exceptions.
Receiver No The system auto-assigns this number representing the receiver number.
Batch No Displays the batch number for this receiving batch.
New To Rec Loc If the PO was generated to the wrong receiving location, a new location may be entered to receive the product into.
Default Bin If using Bins, you may enter the Default Receiving Bin that will be auto-assigned to all items being received.
7. Tab Qty Rec. This value should always match the amount of inventory shipped, regardless of rejected or damaged inventory. (A journal entry is made for rejected items, and must net against what was actually received so AP Accruals aren't overstated.) If there is a discrepancy or the receiver is not complete, delete the amount currently displayed and enter the correct amount. To make the quantity received = 0, change the field to blank. The purchase order will remain open until all inventory ordered/due is received.
8. Rejecting Inventory
If items were damaged, you may reject them. Click the Reject button.
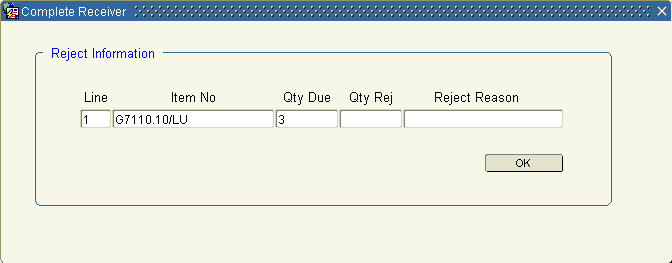
Enter the Qty Rejected and select a reason for tracking. Click OK.
*If inventory was damaged in transit, you must receive the inventory and process it separately as a Freight Claim, via the Service Desk module.
9. Click Process. When all PO’s have been received, you may exit the form.