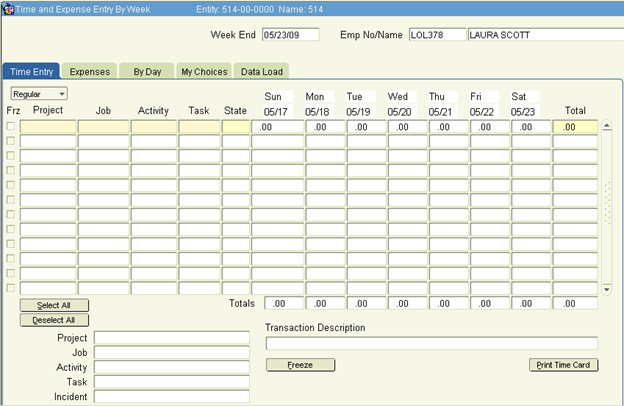
1. Information must be entered in the fields listed below. Type your entry, or select it from the LOV. Tab to move from field to field. If a field is on the screen is not listed below, leave that field blank.
Emp No/Name |
In most instances, your employee number/name appears in this field and cannot be modified. In special instances, privileges are assigned to enable an individual to enter time for other employees. If you have this privilege, you may modify this field in order to enter time for others. |
Week End |
Defaults to the end date of the current week. To modify, double click to open a calendar. Select a weekend date and click OK to populate the field with that date. Weekending dates default to Saturday. Note: Khameleon supports flexible work weeks. Your administrator may change your systems ‘Starts on Day’ in the Project Accounting Controls, based upon your company requirements. |
Project |
Enter (or select from the LOV) the project associated with this labor. Use the My Choices tab to determine which project(s) will automatically appear here. Combinations of project/job/activity may be restricted in options found in the Employee Master screen. |
Job |
Enter (or select from the LOV) the job associated with this labor. |
Activity |
Enter (or select from the LOV) the activity associated with this Labor activity. Note: Within the LOV, activity/task combinations will reference the Order Number, Line Number and Item Number for activity/tasks that originate from Order Entry. |
Task |
Defaults based on the activity chosen above. |
Description |
This defaults to the Activity/Task description. A user may override this description. It will be associated to all time entered for the week. |
State |
In most instances, you will accept the default, which represents the state in which the labor was performed. However, you may modify the entry by deleting it and selecting a new one from the LOV. |
Sun through Sat |
Enter the number of regular hours spent during the selected day on the specified project/job/activity. (To enter Overtime the drop down must be changed from ‘Regular’ to ‘Overtime’.) The total number of hours worked each day is displayed at the bottom of the appropriate column. The Totals row includes total hours worked on all projects/jobs/activities for the specified day. If the project was set up with an incorrect start date such that time cannot be entered, then go to PA\Maintenance\Activities\Activate Project Job Activities and query the project to change the start date of the project. (Your administrator does this.) |
2. Save. (You should always save before switching to another tab)
Other Information:
In the lower left, Khameleon will display the Descriptions of the associated Project, Job, Activity and Task for the highlighted line.
If time is entered from Service Desk, the Incident number is displayed.
Totals are displayed for each day of the week, based upon the time entered.
Select All, De select All and Freeze buttons may be used to ‘Freeze’ time for the week displayed. Refer to the ‘Freezing Time and Expenses’ section for details on this process.
The Print Time Card button may be used to generate a Time and/or Expense report of time entered for a period. Refer to the ‘Print Time Card’ section for details on this process.
Enter Expenses
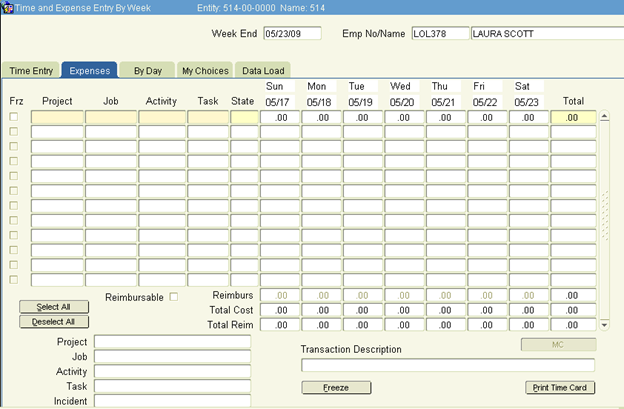
3. Follow steps 1 and 2 under Enter Time
Sun through Sat Enter the total cost of the expense on the selected day for the specified project/job/activity. The Total field at the end of each row calculates the total amount of expenses for the entire week for the specified project/job/activity.
4. Address these additional fields on the Expenses tab:
Reimbursable Information from the Activity Master screen provides the default check mark, indicating the activity is reimbursable. The check mark also enables the system to automatically create a voucher in the Accounts Payable module. If the box is not checked, the activity is not reimbursable. Note: A reimbursable expense activity will allow the user to uncheck this box in the case the expense, in a particular instance is not reimbursable, but the opposite is not true.
Note: Expense reimbursement may be set to reimburse expense to a Vendor, instead of the employee (I.E. Credit Card Vendor). This may be set in the Activity Master for reimbursable activities.
Reimburs The reimbursable amount for the selected project/job/activity is displayed below the appropriate day. This amount defaults to the cost amount for the expense if one is defined in the project.
Total Cost The total cost of the expense is displayed below the appropriate day.
Total Reim The total amount of the reimbursement is displayed below the appropriate day.
State The state in which the expense was incurred is displayed by default. If this is not accurate, you can modify it by deleting the entry and choosing the correct one from the LOV.
5. Save. (You should always save before switching to another tab)
Other Information:
In the lower left, Khameleon will display the Descriptions of the associated Project, Job, Activity and Task for the highlighted line.
The Incident number is only displayed for Labor activities.
Select All, De select All and Freeze buttons may be used to ‘Freeze’ expenses for the week displayed. Refer to the ‘Freezing Time and Expenses’ section for details on this process.
The Print Time Card button may be used to generate a Time and/or Expense report of time entered for a period. Refer to the ‘Print Time Card’ section for details on this process.
This tab displays data previously entered on the Time Entry and Expenses tabs. Time and Expenses may also be entered on this tab.
The following fields on the By Day tab serve the purpose(s) indicated:
Frz A check mark indicates you are confident that the hours/expenses that have been entered are complete, correct, and ready for manager approval. (See step below.)
Day Day the employee worked, or the day the expense was incurred.
Project Project associated with the labor/expense that occurred on the specified day.
Job Job associated with the project performed on the specified day.
Activity Activity associated with the project/job performed on the specified day.
Task Task associated with the project/job/activity performed on the specified day.
Incident If the time is originating from Service Desk, the incident associated is displayed.
Type Project/job/activity is designated as either ‘L’abor or ‘E’xpense.
Hours Either the regular hours worked or quantity of expense for the project/job/activity.
OT Overtime hours worked on the project/job/activity.
Cost Unit cost rate for the specified expense.
Desc Description of the activity to which time and/or expense has been applied.
Status Current status of the project/job/activity. (Options for modification are either New or Frozen. Once frozen, non-modifiable status can be either Approved, or Sent. Sent lines are held in this window for 60 days for history purposes, but may not be modified.)
State State in which the transaction occurred.
Reimbursable? A check mark indicates reimbursable expense. This field is modifiable only if the item's status is New.
Reimburse Amt Reimbursable portion of the expense.
Notes This button may be used to add detailed notes regarding a specific time or expense, specific to the day.