F9 v5.0 Client Installation
Operating Systems Supported
● Windows XP (32 bit)
● Windows Server 2003 and 2003 R2 (32 and 64 bit)
● Windows Server 2008 (32 and 64 bit) and 2008 R2 (64 bit)
● Windows Vista (32 and 64 bit)
● Windows 7 (32 and 64 bit)
● Windows 95/98/ME and Windows 2000 are no longer supported
● F9 Professional LDI Editor supported on Windows XP
Microsoft Office Excel Versions Supported
● F9 Version 5 - Excel 2007 - 2010 (32 bit or 64 bit)
● F9 v4.5 and F9 v4.2 - Excel 2000 - 2010 (32 bit)
Microsoft .NET Framework Requirements
● F9 Version 5 - .NET Framework 3.5 is required
Terminal Server and Citrix
● Windows Server 2003 and 2003 R2 (32 and 64 bit)
● Windows Server 2008 (32 and 64 bit) and 2008 R2 (64 bit)
Databases Supported (Dependent on accounting system)
● Microsoft SQL Server 2000/2005/2008/2008 R2, SQL Express
● Pervasive up to version 11 (client 32 bit)
● Providex 5.14.0.0
● FoxPro 9
● Btrieve 6.15
● Oracle 10g
Step |
Server |
Detail |
Command |
|
1 |
Client Server |
Download F9 Client Software |
ftp://ftp.khamsoft.com/Software/F9_Installer/ Username : ftpguest Password : hi$in$21 F9_V5_Report_Writer.zip |
|
2 |
Client Server |
Install F9 Client Software. Installs Btrieve management tools for the Btrieve transactional database on the server. |
Unzip F9_V5_Report_Writer.zip and run F9V5PRO50B.exe
|
|
3 |
Client Server |
Note : To be safe you can take a cold backup of khameleon database, Infra database, Khameleon Home. Close any open Excel workbooks. |
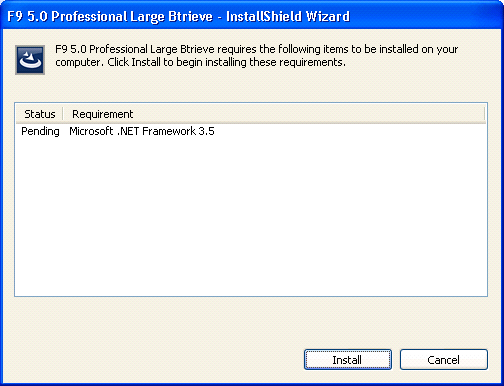
F9 Client setup automatically installs required prerequisite on client machine if needed. Click Next ( It may take 5 to 10 Min to install Microsoft .NET)
|
|
4 |
Client Server |
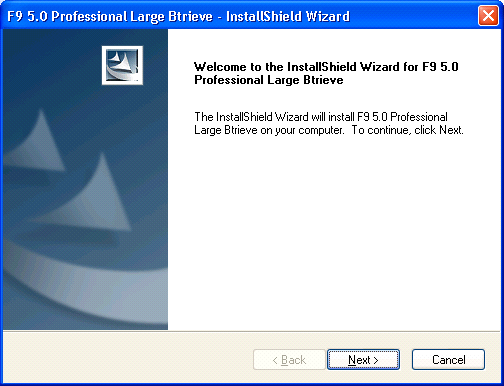
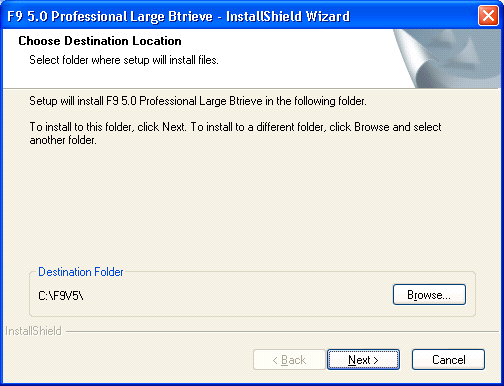
Once the required prerequisites are installed on the Client machine rerun F9V5PRO50B.exe to install F9 Client |
|
|
5 |
Client Server |
Click Next |
|
|
6 |
Client Server |
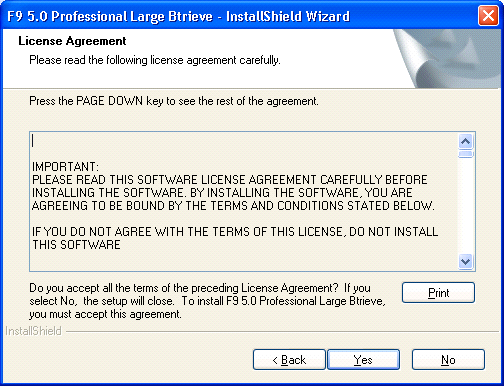
Click Yes |
|
|
7 |
Client Server |
Click Next |
|
|
8 |
Client Server |
Click Finish |
|
|
9 |
Client Server |
Copy Security file from F9 Admin Server to client workstation. |
Copy Security.F9 file from F9 Admin Server (\\Apps_server\F9Data\SECURITY.F9) and replace the empty Security.F9 file in C:\F9v5\PRO50_b directory on the workstation. |
|
F9 Configuration Steps |
Open C:\F9V5\pro50_b\F9V5ReadMe.pdf and complete below steps to complete installation 1. Check Office Settings Because F9 Version 5 has been developed under a completely new technology, Microsoft .NET Framework, users need to ensure support for .NET Add-ins has been setup as part of their Office 2010 or 2007 installation. Without this, F9 Version 5 will not attach in Excel. To check for this installation component: 1. Close Excel 2. Run Control Panel, Programs and Features, Programs, (or in earlier versions of Windows Add or Remove Programs), select Microsoft Office 2010 (or Office 2007) 3. Select Change 4. The next window should display 4 options, check the first item: Add or Remove Features 5. Click Continue 6. Within the tab Installation Options, expand Microsoft Office Excel 7. Click on the arrow for .NET Programmability Support. If the required component is not installed, you should see the following: 8. Click the dropdown arrow for .NET Programmability Support 9. Select option: Run from My Computer 10. Expand Office Shared Features. 11. Click on the arrow for Digital Certificates for VBA Projects. 12. If the required component is not installed, select option: Run from My Computer. 13. Click on the arrow for Visual Basic for Applications. 14. If the required component is not installed, select option: Run from My Computer. 15. Click Continue to have the support installed. 2. Complete Administrator Steps (configuring access permission to F9v5 folder) Assign Modify Rights to the F9V5 folder for F9 Users This is required if you intend to create financial entity files in the F9V5 folder. If you choose a location other than the F9V5 folder, then users must have modify rights to that location. a. Using Windows Explorer, right-click the C:\F9V5 folder and click Properties b. Select the tab: Security c. Add the Everyone user d. Click Modify and then Apply 3. Attach F9 to Excel – Open C:\F9V5\pro50_b\F9V5ReadMe.pdf if F9 tab does not appear. 4. Run F9 Setup to access your Accounting Data See directions in the Setup F9 Client below. 5. License Activation in F9. Have your 20 digit serial number available. Open Excel, select License Manager. Enter the SN, and then choose the Web button. Select the activation code from the response page and enter it in on your client. 6. Setup Manual Calculation Mode in Excel Open Excel. Select File Tab Select Options Select Formulas Enable the Manual Calculation Option button Uncheck Recalculate workbook before saving. Click OK |
|||
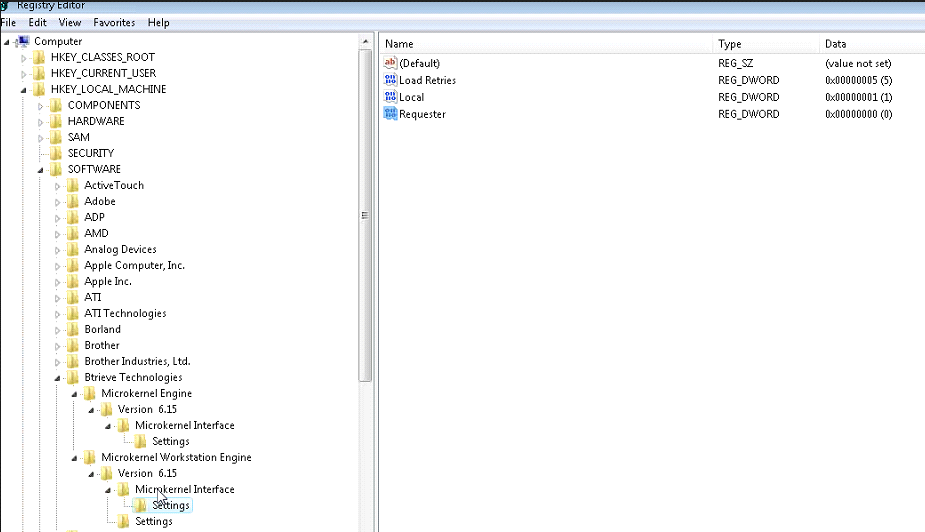
Add following registry value in client work station. Reboot workstation if Btrieve Technologies Key does not exist, or browse to the F9V5\pro50_b\ folder run W32MKSET.exe, click Save and Exit. |
The Requester Value. If the Requester value on any F9 installation is a value other than zero, Excel will lockup on all F9 installations. Run regedit.exe and browse to ● HKLM --> SOFTWARE --> Btrieve Technologies -- microkernal workstation engine -- version 6.15 -- microkernal interface --> settings - requester should be 0 ● On 64 bit: HKLM --> SOFTWARE --> WOW6432Node à Btrieve Technologies -- microkernal workstation engine -- version 6.15 -- microkernal interface --> settings - requester value must be 0
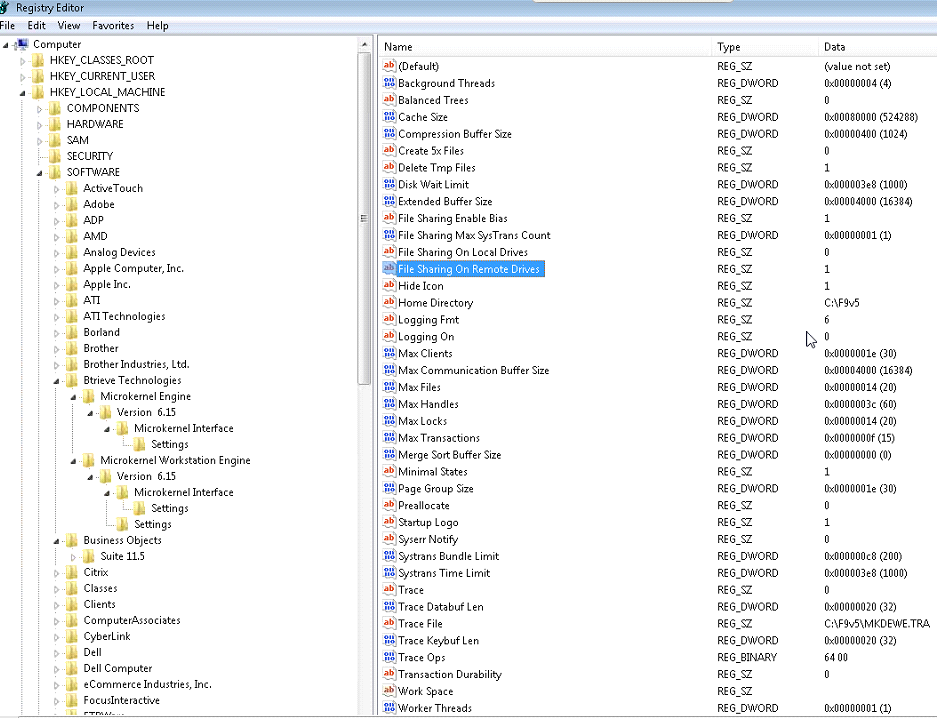
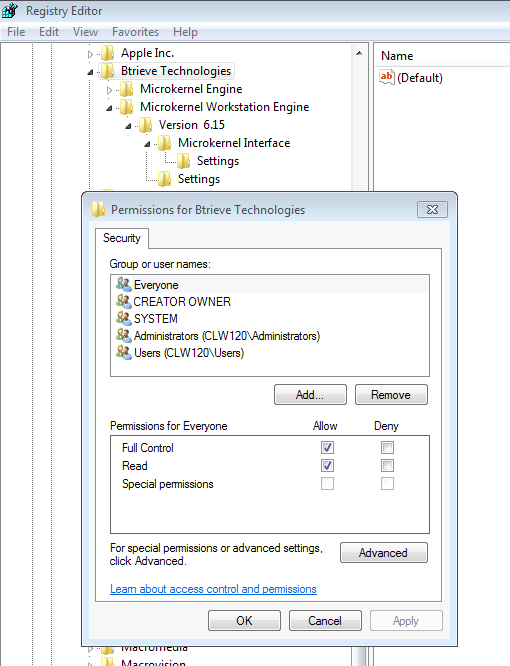
● HKLM --> SOFTWARE --> Btrieve Technologies -- microkernel workstation engine -- version 6.15 -- settings -- > home directory --> c:\f9v5 trace file c:\f9v5\mkdewe.tra File Sharing On Remote Drives 1 Set Permissions on the Btrieve Technologies Key Open Permissions on the Btrieve Technologies Key, add the Everyone group and set the permissions for Everyone to Full Control. See example below.
|
|||
Setup F9 Client |
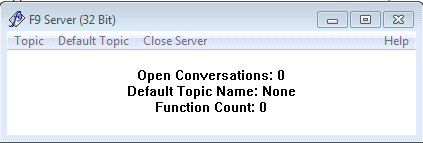
C:\F9V5 Launch F9.exe
|
|||
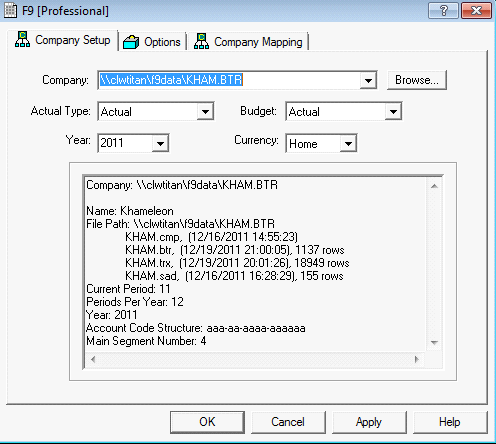
Select Topic and then Setup. On the Company Tab, Add the UNC Path to the .btr file on the server. Change the Year to the current year
|
||||
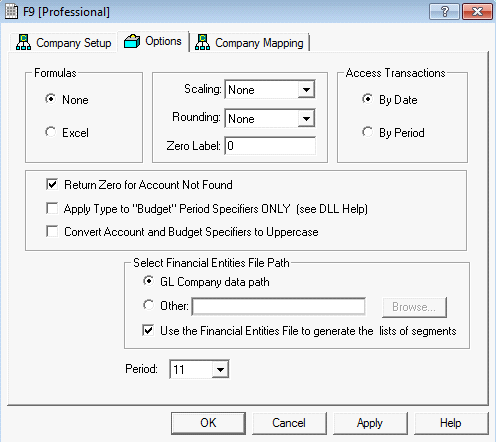
On Options tab, change the Period to the current working period. Period here is defined as “month” by default, and it overrides the current month defined by the company profile on the company setup tab.
|
||||
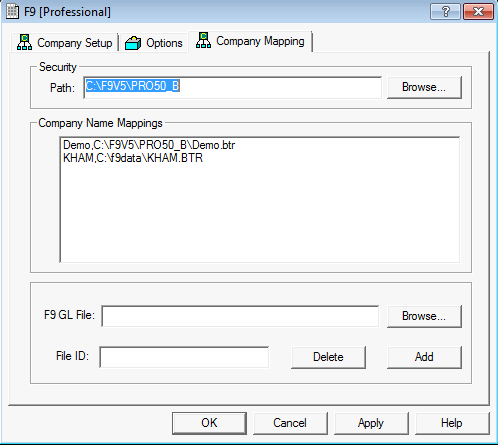
On Company Mapping tab, Set the SECURITY.F9 file path to the C:\F9V5\PRO50_B
|
||||
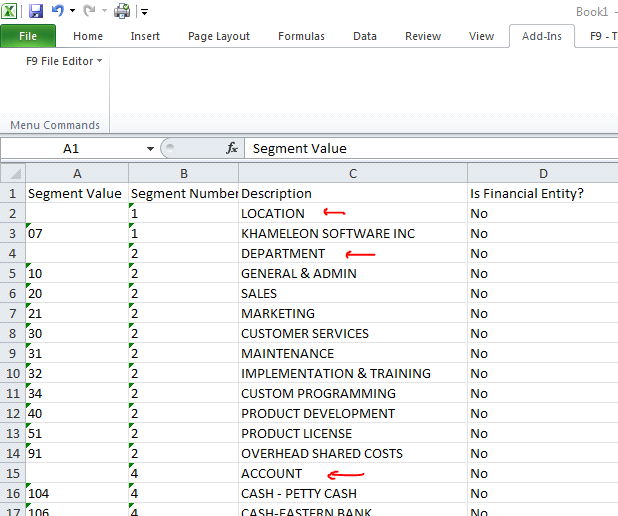
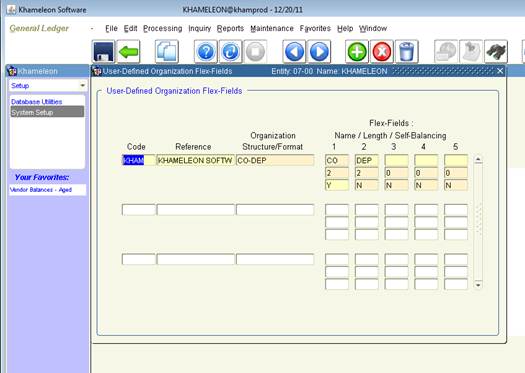
One Time Setup: Now modify Segment name as show in screen shot. You may need assistance from accounting to obtain your account structure. Or see instructions below: How to identify segment lengths in Khameleon. |
Open Excel. Open C:\F9V5\f9edit.xll On the Add-Ins tab, Choose F9 File Editor. Load a Financials Entry File (.SAD) on the f9data share on the server. Add a Name description for segment 1, 2, 3, and 4. The Division accoun t segment is only setup in Khameleon when customer has multiple divisions within a company.
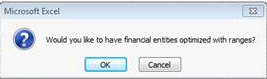
This is an example of customer with only 3 segments in use. There are no Divisions. Go back and choose F9 File Editor and Save a Financials Entry File. Select the .SAD file and choose Save. Select Cancel is prompted to have financial entities optimized with ranges. Confirm Change.
|
|||
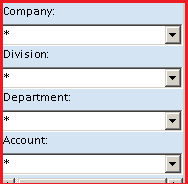
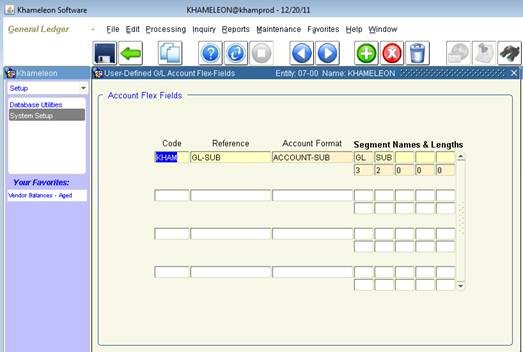
Typical Names for segments. Segment1 -- “Company” Segment2 -- “Division” Segment3 -- “Department” Segment4 -- “Account” Verify the changes within F9. Open Table Report to view changes. Example: accounting structure 3,2,4,6 looks like aaa-aa-aaaa-aaaa |
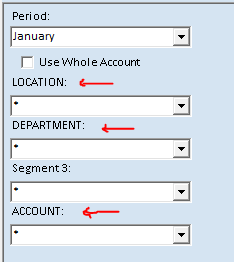
In our example, The Location, Department and Account labels have been applied to Segment 1, 2, and 4. Segment 3 is not in use.
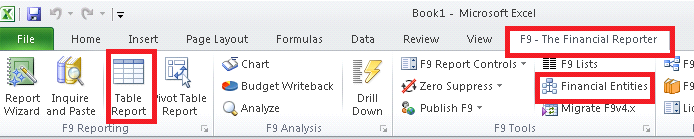
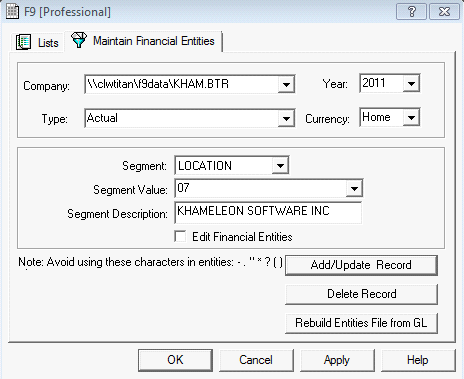
Go to à F9-The Financial Reporter -> Financial Entities -> Another location to setup and verify Segment names
1) Select Company Name 2) Select Segment Name Ex : Segment1 3) Remove values within Segment values ( Should be Null) 4) Segment name should be any one as below, You may need assistance from accounting to obtain your segment names Segment1 -- Company Segment2 -- Division Segment3 -- Department Segment4 – Account 5) Click Add/Update Record 6) Click Rebuild Entities File form GL 7) Ok |
|||
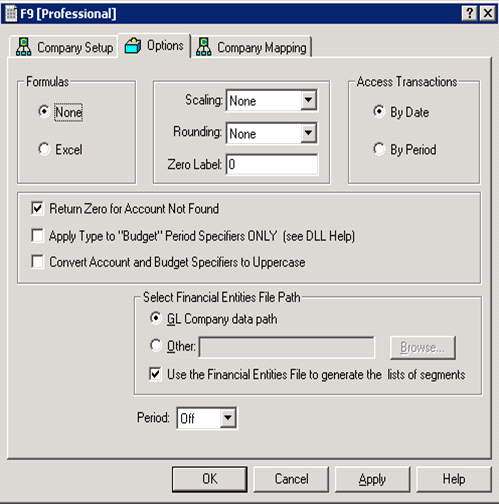
Divisions ON/OFF setting: Launch F9 Professional. Check the box for Use the Financial Entities File to generate list of segments" in the F9 setup /options window for companies which have Divisions and need them to appear in F9. |
|
|||
3 |
How to identify segment lengths in Khameleon. The first segments are defined by the organizational flex fields. GL account is always the last segment, where the length = the sum of the segment lengths defined in Khameleon. 3Segment Structure Example: LOCATION = 2 DIVISION = N/A DEPARTMENT = 2 ACCOUNT = 3+2=5 This account structure is 2,2,5 It looks like: aa-aa-aaaaa |
|
||
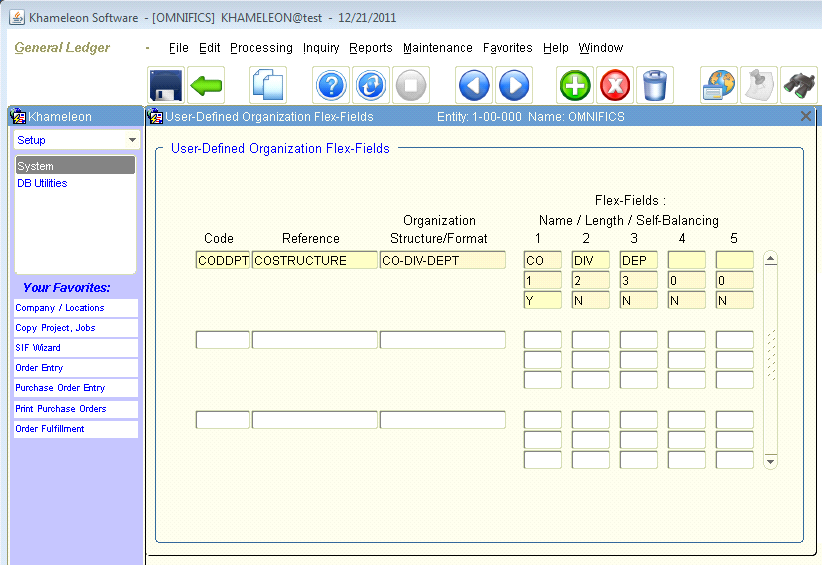
4 Segment Structure Example From Khameleon User-Defined Organization Flex Fields form, Segment 1, 1 character, Segment Name: COMPANY Segment2, 2 characters, Segment Name: DIVISION Segment3, 3 characters, Segment Name: DEPARTMENT |
|
|||
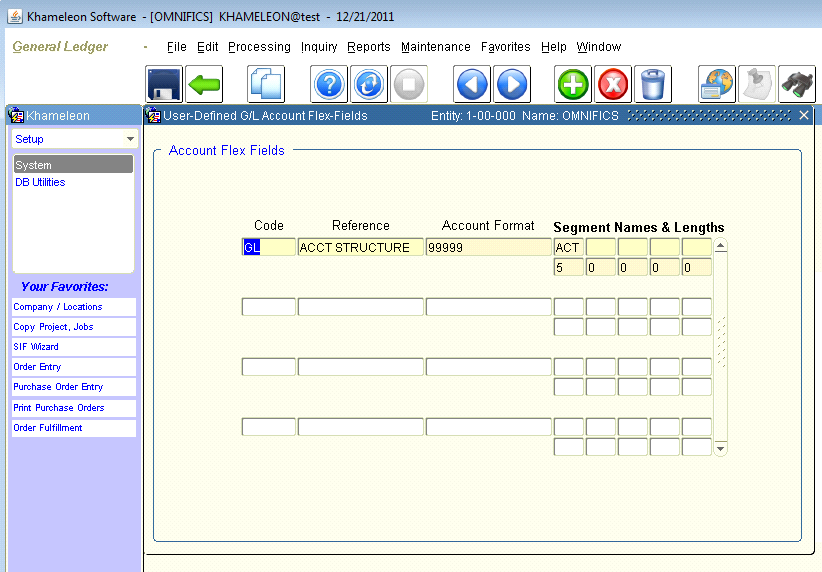
From Khameleon Account Flex Fields form, Segment4, 5 Characters, Segment Name: ACCOUNT This account structure is 1,2,3,5 It looks like a-aa-aaa-aaaaa |
|
|||
Final Considerations |
● Make certain to include F9 program directory, F9 reports directory and F9 data directory into your IT backup policy. ● Automate F9 data update by scheduling the Oracle F9ALLUpdate.BAT on the server. See Administration Installation Guide for directions. ● Have your IT administrator modify or improve the BAT file if additional tasks should be carried out (e.g.: backup F9 data files before running F9 data update, etc.) ● Periodically, delete or rename and zip F9 Datapump log file (pump.LOG in \\vs-khamapp\c$\F9v5\ pro50_b directory) in order to keep the log file size manageable. ● From Khameleon Accounting/ General Ledger/Processing/F9-Extract, users may launch Detail or Summary data update in addition to the automated F9 data updates. ● When running reports, do not click with the mouse until the run is finished. ● Validate data in F9 client. Run a Table Report on current year against a period with Whole Account box checked. Note: Khameleon checks the box for Calculate Open Year Balance, in Summary Actual Base Currency Profile. This locks the files by opening files in exclusive mode. Close all F9 client sessions in Excel before running datapump jobs |
|||
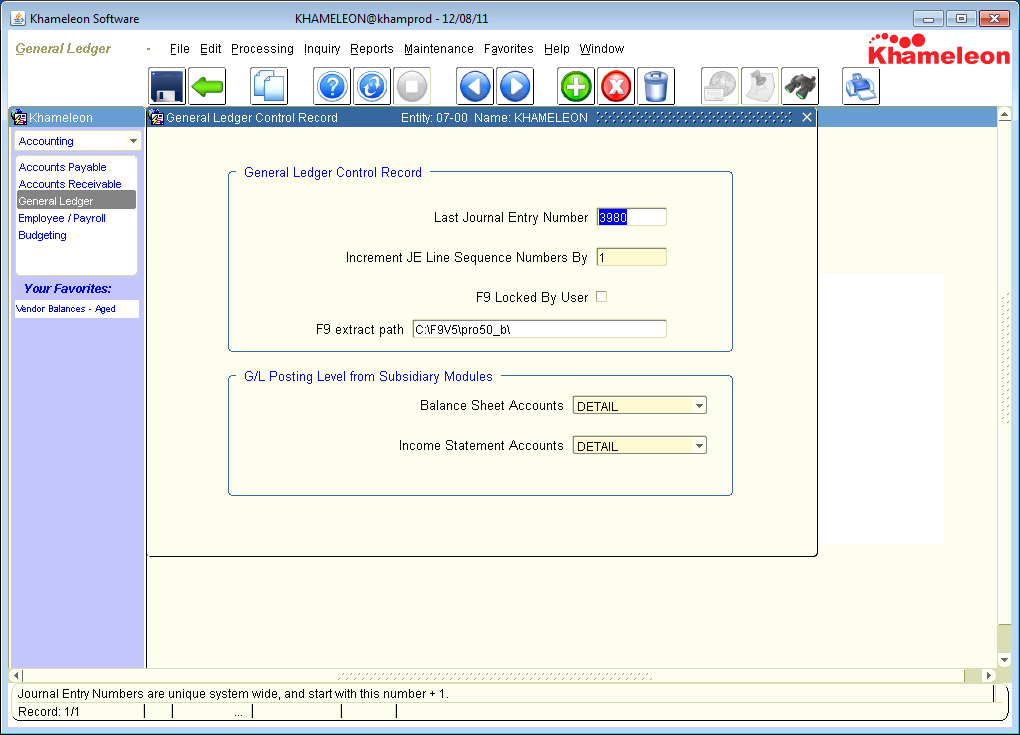
In Khameleon, setup the General Ledger Control Record. The F9 extract path is the absolute path to the F9 pro50_b folder from the Administrator Installation on the Application Server. In most cases either E:\F9V5\pro50_b\ or C:\F9V5\pro50_b\ This window is in Accounting/General Ledger/Maintenance/ G/L Control Record |
|
Test the on demand datapump. 1. Close any Open F-9 Excel Worksheets and run “Detail”. When process completes, the BTR and TRX f9data files generally change to the current timestamp. 1. Close any Open F-9 Excel Worksheets and run “Summary”. When process completes, only the BTR f9data file changes to the current timestamp. Definitions: BTR file – Contains a Chart of Accounts and Balances (Btrieve format) CMP file – Contains basic company information (Company) SAD file – Contains account segment descriptions (Segment Descriptions) TRX file – Contains transaction detail information (Transaction details – if imported) This window is in Accounting/General Ledger/Processing/F-9-Extract |
|