From the Main Menu, go to Distribution\Purchase Order\Project Order\ Processing\Purchase Orders\Print Orders.
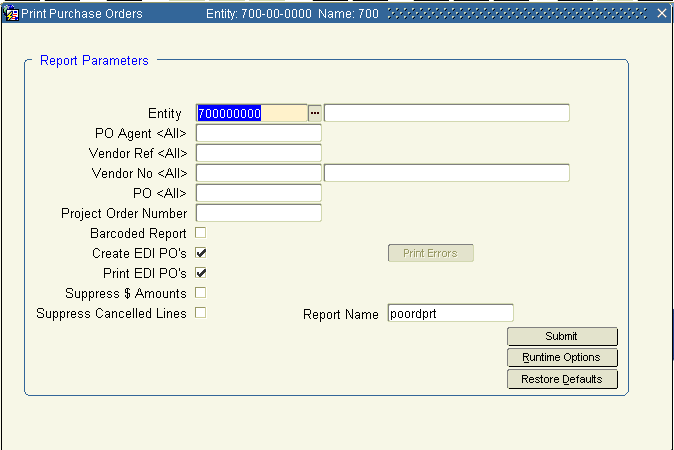
1. Specify the Purchase Order(s) using the following fields. If you leave the fields blank, then all purchase orders that haven't been printed, or have been selected for re-printing, will appear.
PO Agent
Vendor Ref
Vendor No
PO
Bar-coded Report? (Not Applicable)
2. You must check the Create EDI P/O’s? box to enable the system to send any Purchase Order tagged as “EDI-Capable”, to a vendor. Once a PO is sent EDI, it cannot be re-sent. If an EDI-Capable PO is in the criteria, but the Create EDI POs box is not checked, it will be printed, but not sent. To send the PO electronically, use the Reprint Selection Process to reprint and create the EDI PO.
3. If the Create EDI P/O’s box is checked, then the Print EDI P/O’s box will become available and will enable you to check it in order to print the purchase orders. This field can remain un-checked, in order to avoid printing those purchase orders being sent electronically.
4. There is a print errors bar on this screen that is activated only when there are errors in the creation of the edi transactions. Should errors occur, click the bar to print the error report. Then print the purchase order(s) again. This bar will be enabled only for the user who printed the purchase order originally. It will remain enabled until an error-free process has taken place.
5. Suppress $ Amounts may be checked if you are sending a PO to a 3rd party that shouldn't see the PO dollar amounts.
6. Suppress Canceled Lines may be checked if you wish to suppress line items from printing that have been canceled.
7. Click Submit.
You may receive a message — There are no purchase orders to send through EDI. Potential solutions to this are:
● Check the vendor setup on the Vendor Loc tab to make sure the EDI capable box is checked.
● Be sure that a company number for EDI is entered for the UD/Web. See Vendor Setup procedures.
● Even though you can print a hard copy of this report, at this point an EDI file has not been created, and you will need to follow the Reprint Purchase Order Procedures process.
You may receive a message — Errors have occurred during the EDI Process. Would you like to run the error report now? Click Yes and print out this report.
If the Error Report has the message —Sold to/Bill to Contact is Missing, then go to the Purchasing\Maintenance\Vendor-Entity Information screen where a valid entity must be set up for this vendor pertaining to this order.
The entity can be determined by first viewing the PO in the Enter Purchase Orders screen where you should get the location number and order number. Then go to the Enter/Confirm Project Orders screen in the Project Orders module and query on the order. Select the Lines tab and move the screen to the right until you can see Credit Sale To. This field indicates the entity that needs to be set up for the vendor in the Vendor-Entity Information screen.
1. PO’s will print to PDF. They may be printed, saved or emailed.
2. If you change the quantity of an item on the order, the system generates a Change Order in the system for the same PO (i.e. 2 to 3 quantity). The system labels this as a Change Order, and at the line item level describes the changes. Some vendors may accept this.
3. If you add additional items to an order and have not printed the PO, or you reset a PO for reprinting, the system will add the new items to the existing PO for the respective vendor.
Note: If you add additional items to an order and have printed the PO for the Vendor, a new PO will be generated. This may be helpful when attempting to stage items for a particular vendor.