**All PO locations must be location 00. This means if you have a vendor with a different lead time that requires a separate PO for that vendor, you would need to have different vendors defined so that both do not get combined on the same PO. Each new PO location must be set up with a loc of 00. All other locations ie shipping, billing etc are add locs off of this main vendor. These can all then point to the same REMIT vendor for check processing.
1. From the main screen for this company/location, click Create Vend. This brings you to the Vendor Master tab.

Enter the following information for your Vendor
UD Rating User defined Vendor rating
One Time Do not use
Status Leave Active
Vendor No Assign the vendor number or if left blank, the system will assign.
Short Name This is the Company Ref. If changed here, it will change it for any new transaction.
Terms Code Assign the appropriate Terms for this vendor.
Vend Type Code Click the LOV to assign a Vendor Type Code created during setup.
Vend Group Code Click the LOV to assign a Vendor Group Code created during setup.
Subledger No Select the appropriate AP Subledger for this Vendor.
Vend Dist Code Using the LOV, select the Vendor Distribution Code to auto assign Expense Distributions during the AP Voucher Process.
Warranty Code Select the appropriate Warranty Code to be assigned for purchases from this Vendor.
UD 1099 Type If this is a 1099 Vendor, select the appropriate type from the LOV.
Vendor AR Contact Enter or assign the appropriate contact person in your Vendors AR department.
Valid in All Entities If you're in a multi-entity environment and sharing vendors, you may click the ‘Where Valid’ button and assign an existing vendor to a new entity or make one Invalid in an entity where assigned.
Soc Sec /EIN If this is a 1099 Vendor, enter the Federal EIN number, or if the Vendor is not incorporated, enter the vendor’s Social Security Number.
Priority Level This is a user defined priority level (9 being highest) that is used during the check selection process.
Click save and click on the Vendor Location tab.

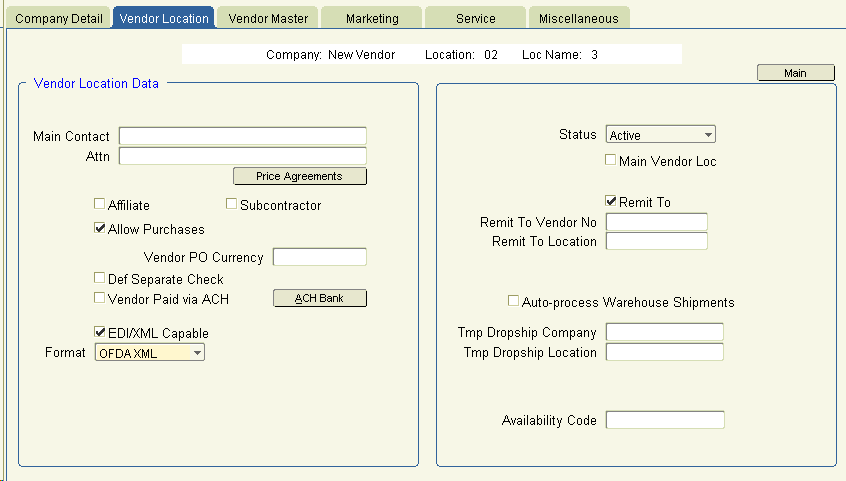
Enter the following information regarding this specific Vendor location:
Main Contact Enter or select from the company contact persons the Main Contact Person at this location.
Attn Enter or select the company contact persons name that should print as the Attn on checks to this Vendor location.
Affiliate Check this box (information only) if this Vendor location is affiliated with your company.
Subcontractor Check this box if this Vendor is a subcontractor for your company
Allow Purchases This box must be checked in order to generate Purchase Orders to this Vendor and Location.
Def Separate Check When this flag is checked, all vouchers for that vendor will have the separate check flag default to checked.
EDI Capable If this Vendor accepts electronic PO’s, check this box.
Status Leave Active.
Main Vendor Loc This will be checked and maintained by the system.
Remit To Check this box if payment should be remitted to this location address. Uncheck if not
Remit To Vendor No/Loc If the Remit To box has not been checked, provide the Vendor Number and Location to remit payments to.
Additional Vendor Setup
For Purchase Order Vendors, complete the following optional setup:
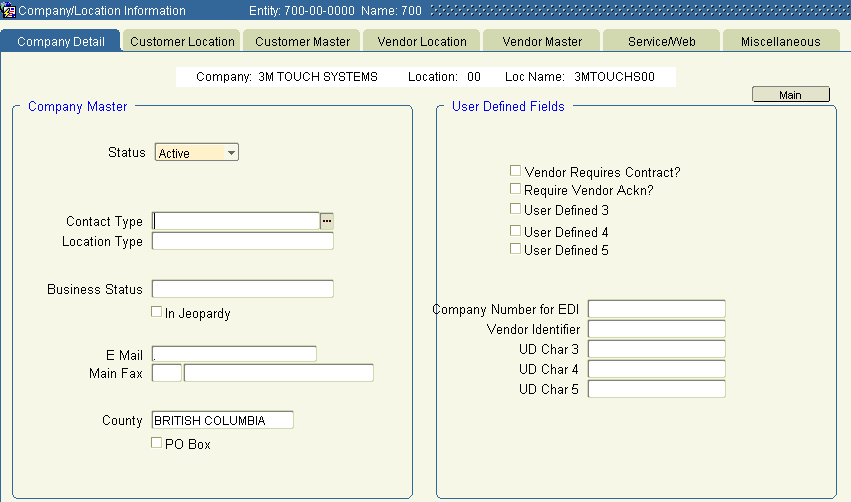
Click on the ‘Company Detail tab

Populate the following User Defined Fields if necessary:
Vendor Requires Contract If a contract number should be required when placing Purchase Orders to this Vendor, check the box.
Require Vendor Ackn If a Vendor Acknowledgment is received for this Vendor, check this box. The system will use this for reporting Orders Not Acknowledged.
Company Number for EDI If electronic PO’s are sent, what is the Company ID number to be used.
Vendor Identifier What is the Company identifier for this vendor?