From the Main Menu, Go to Distribution > Inventory > Maintenance > Warehouse Layout >Stock Locations
The Inventory Stocking Locations window is used to establish unique stocking location codes for each purchase order or shipping location that stocks inventory within a self-balancing entity.
Note: If you have more than one self-balancing entity, stocking locations must be set up for each entity. Stocking locations must be unique within self-balancing entities. At least one stocking location must be established for each self balancing entity using Requisitions, Purchase Order, Inventory, or Order Entry Modules.
Perform the following to establish inventory stocking locations:
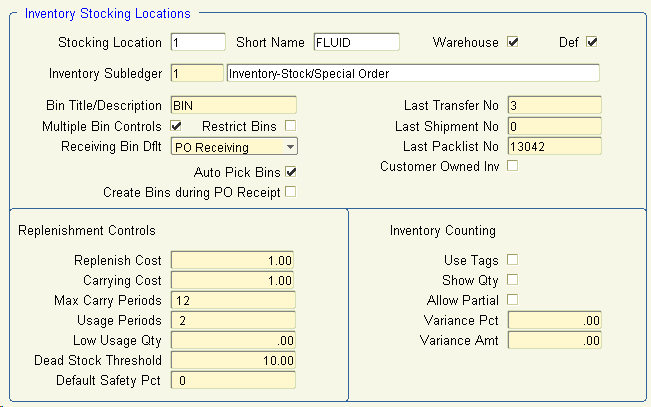
1. Enter the stocking location code in the Stocking Location list or click for a listing of valid values.
Note: Purchase Order locations need to be established first.
2. The default short name for the location is displayed in the Short Name field. This information may be modified.
3. Select the Warehouse? check box if the stocking location is a warehouse.
4. Select the Def ? check box if this stocking location is the default stocking location for the specified entity. One stocking location must be identified as the default stocking location
within each self-balancing entity.
5. Enter the default inventory GL sub-ledger account code in the Inventory Sub-ledger list or click for a listing of valid values. The sub-ledger number may be overridden when entering
information in the Stocked Items window.
6. The G/L Description field defaults when the Inventory Sub-ledger is selected.
Note: You must enter an inventory sub-ledger in the GL Setup Sub-ledgers window before you create stocking locations. The sub-ledger indicates which GL account or accounts represent inventory information.
7. Enter the inventory bin location system for the specified stocking location in the Bin Title/Description field. This information appears on reports and other windows in Inventory Management where bins or storage locations are entered or displayed.
8. Select the Multiple Bin Controls check box if items are allowed to be placed in multiple bins.
9. Select the Restrict Bins check box to allow auto bins setup in the receiving process.
10. Enter the last transfer number used for this location in the Last Transfer No field. The system uses this information to begin auto-assigning transfer numbers.
11. Enter the last packing list number in the Last Packlist No field. The system uses this information to begin auto-assigning packing list numbers in the Order Entry Module.
12. Select the Customer Owned Inventory field if the stocking location stores customer owned inventory.
13. Enter the default replenishment cost for stocking and handling inventory items in the Replenish Cost field. This value can be modified by item. Enter zero if you do not use replenish cost. Replenishment costs are used in the calculation of economic order quantities (EOQ) and average usage.
14. Enter the default cost of carrying items in the Carrying Cost field. This value can be modified by item. Enter zero if you do not use carrying costs. Carrying costs are used in the calculation of EOQ.
Note: Floor plan costs, interest, warehouse rental, etc., may be considered in the carry cost calculation.
15. Enter the default maximum number of periods to carry stock for the specified location in the Max Carry Periods field. This information is used to determine the maximum quantity of an item that should be ordered. The recommended order quantity may not be greater than the monthly usage times the maximum carrying periods. If the recommended order quantity is calculated to be higher, the system uses usage as the recommended order quantity.
16. Enter the number of usage history periods to use during Calculate, Set Average Use Rates in the Usage Periods field. Usage quantity equals usage during each usage period divided by the number of periods.
17. Enter the default quantity of units considered low usage in the Low Usage Qty field. This information is used during Calculate, Set Recommended Order Quantities. A freeze code of
‘LOW’ is set if the usage is calculated to be lower than the low usage quantity. The item will require review prior to calculating recommended order quantities.
18. Enter the usage amount considered to be dead usage in the Dead Stock Threshold field. ABC/Class Calculation sets these items to class 13 and excludes them from the Set Average
Usage Rate Calculations process.
19. Enter the default safety stock percentage in relation to usage levels in the Default Safety Pct field. This information is used in setting recommended order quantities. When calculating recommended order quantities, the amount is always increased by the safety percent.
20. Select the Use Tags? field if pre-numbered inventory control tags are used when counting inventory.
21. Select the Show Qty? field to display system quantity on-hand values during inventory count entry.
22. Select the Allow Partial? field to allow partial counting of inventory.
23. Enter the maximum variance percentage permitted for inventory counts in the Variance Pct field. Variances beyond those specified in this field must be recounted and reviewed by the inventory manager.
24. Enter the maximum variance amount permitted for inventory counts in the Variance Amt field. Variances beyond those specified in this field must be recounted and reviewed by the inventory manager.