The Khameleon Workbench represents a profile driven ‘landing page’ for users to quickly have access to reports, data entry points, and task notifications associated with their particular role within an organization. There are a variety of standard Workbenches available in Khameleon, each intended to speak to a different audience. The standard Khameleon Workbenches available are shown below:
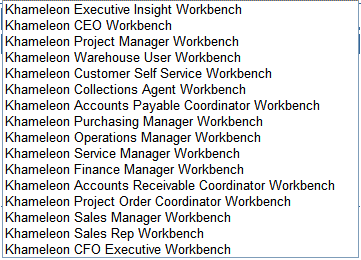
The content of each Workbench can be configured by the Workbench Administrator. Each Workbench can be renamed, configured to include different or new reports, favorites, and menu items. The Workbench Administrator also configures what Workbench a particular user belongs to. A single user can belong to one and only one Workbench.
These configuration changes are all made from the Administrator Workbench, which can be accessed by the Khameleon user, from the link below:
http://[yourapplicationserver]/pls/portal
The Administrator Workbench is segregated into distinct frames. When a change is made within a particular frame, the Submit button is used to commit that change, which refreshes the entire page.
The first step is to select a particular Workbench to configure from the list of available Workbenches, then click the Go button.

If you would like to rename the Workbench so that it appears to the users under a different title, the frame on the right hand side of the Administrator Workbench allows for this.

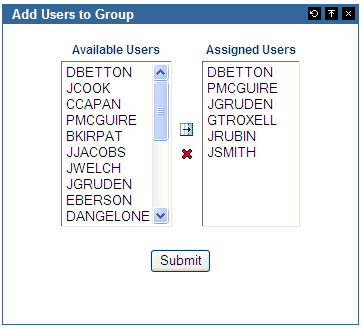
To add or remove users belonging to the current Workbench, use the User Group frame outlined below. If a user is currently assigned to a different workbench and appears in the left hand column as available, selecting that user into the current Workbench will remove this user from their previously assigned Workbench.
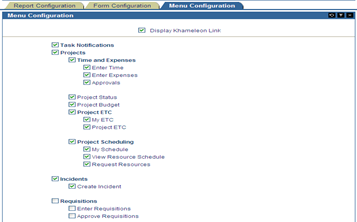
The Menu Configuration tab is used to control the contents of the Workbench menu, as it appears to users within the Workbench group. These menu items provide access to data entry screens from the Workbench. The Khameleon Link is used to call the full Khameleon application main menu from the Workbench. To make changes, simply check or uncheck the values next to each menu item, then click submit.
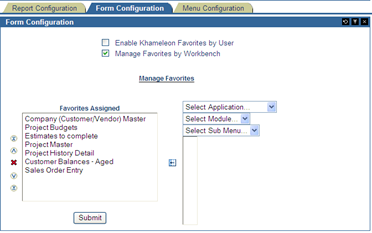
The Form Configuration tab is used to control how Favorites will be displayed to users within the Workbench group. When accessing the Khameleon application, System users have the ability to create their own Favorites links. For a Workbench where members are primarily System users, it may be best to allow Favorites based on User. For a Workbench were members are primarily Workbench users – who do not have access into the Khameleon application except through Favorites, the best deployment is to Manage the Favorites by Workbench.
Within the Forms Configuration tab, Administrators can change the sequential presentation of Favorites, as well as double click the item to rename the way that the Favorite will be displayed to the user.
The Report Configuration tab is used to control the Report Links that will be available to users within the Workbench group. The report designated first will represent the default reporting output that users belonging to this Workbench will see when they first login.
Within the Report Configuration tab, Administrators can change the sequential presentation of Reports, as well as double click the item to rename the way that the Report Link will be displayed to the user. Available reports on the right hand side are segregated by reporting category.
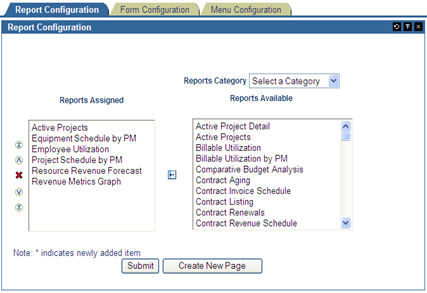
Creating a New Page – If an existing BI Discoverer report is modified and saved under a different name – or if a reports administrator creates a completely new report – the Create New Page button within the Report Configuration tab is used to enable the new report to be published to a Khameleon Workbench.
After clicking the Create New Page button, the user is presented with a canvas requiring (4) input values, with descriptions of each of those inputs presented below.
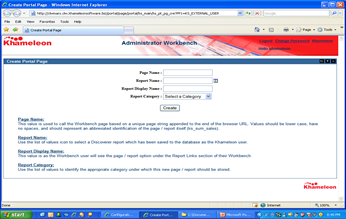
The text below outlines how to populate the (4) required fields within the Create New Page canvas:
Page Name: This value is used to call the Workbench page based on a unique page string appended to the end of the browser URL. Values should be lower case, have no spaces, and should represent an abbreviated identification of the page / report itself (ks_sum_sales).
Report Name: Use the list of values icon to select a Discoverer report which has been saved to the database as the Khameleon user. Reports that are currently in use on another page will not appear in this list. One report file = One Workbench Page.
Report Display Name: This value is as the Workbench user will see the page / report option under the Report Links section of their Workbench.
Report Category: Use the list of values to identify the appropriate category under which this new page / report should be stored.
After these (4) values have been provided, the Create button will create the new page and display a success hyperlink on the screen, similar to the below screenshot.
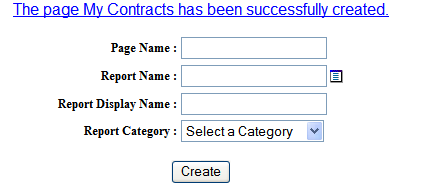
By Clicking the success link, the Workbench Administrator will be taken to the Portal Navigator program, which represents the area where all infrastructure and elements of the Khameleon Workbenches are stored and maintained. Within Portal Navigator, the below steps will be required to complete the creation of the new Workbench page.
Within the new page, click the icon circled in the screen shot below to create a new Portlet in the Discoverer Region.
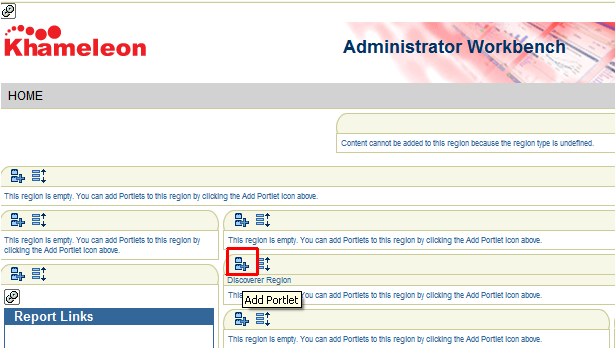
Within the Add Portlets section, select Portlet Staging Area> Next> KS_DISC_Provider> Next> Discoverer Worksheet> OK.
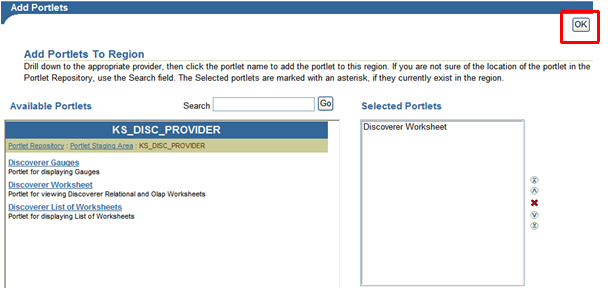
The above steps have created a new Discoverer Portlet which remains undefined. The steps below will provide the necessary details for the Portlet to display the components intended to be published to the Workbench.
Click the Edit Defaults link in the new undefined Portlet, as shown below.

Change the Radio Button within the Users Logged in Section to ‘Display same data using the Publishers Connection', as shown below. Then click Next.

In the window provided, select the report and specific Worksheet to be published, then click Next.

In the Portlet Options section, define the components that you wish to be displayed from the Discoverer report, as well as the options for Analyzing the report, then click next.
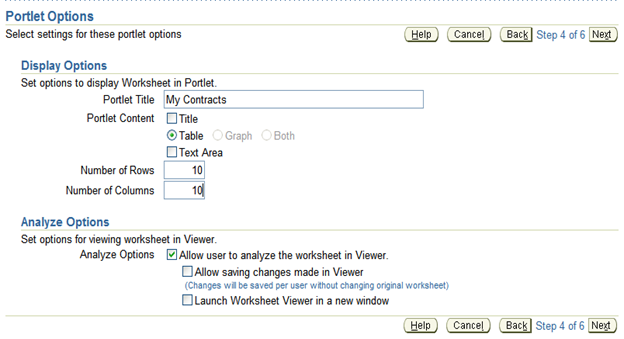
Portlet Title – this should but does not necessarily have to mirror the value used for Report Display Name in the Create New Page canvas.
Portlet Content
Title Display the title bar from the Discoverer Report? This is often redundant and wastes valuable space within the Workbench – leave unchecked.
Table, Graph, or Both If the Discoverer report has a graph, do you wish to show just the report, just the graph, or both?
Text Area Reports have a text area to display static text. If used, this can be checked.
Rows & Columns How many rows and columns of the report do you wish to display before the user needs to click [Right] or [Down] to see additional data? 10X10 Max.
Analyze Options -Check the Allow user to analyze the worksheet in Viewer if you want to give users the ability to resort / drill down on the data as initially reported.
-Always leave Allow saving changes made in Viewer unchecked.
-If allowing Analyze, always check Launch in a new Window
Define how often you would like for the Workbench page to automatically refresh, as well as when the refresh should occur. Refreshing during off peak hours will reduce any potential drain on system resources. Click Next.

In the final screen, review the details established in the prior steps and click finish. This will create the new Workbench page according to the parameters defined. After initial creation, you may need to click the Refresh Portlet to see immediate results before the first scheduled refresh defined above.

After previewing the finished product, close the Portal Navigator window to return to the Administrator Workbench. Click the refresh button on your browser to see the new report page added to the Report Configuration tab in the list of selected reports.
The new page is then available for publishing on any additional Workbenches.