From the Main Menu, go to Accounting/ Accounts Receivable/ Processing/ Process Invoices.
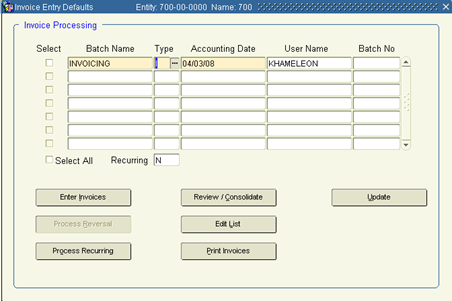
Create a new record.
In Batch Name, enter a user defined batch name to reference this transaction.
*Each batch created during the day should be in sequence, using a different number for all types of transactions. (Do not restart sequencing for different types of transactions.)
Type should default to ‘I’
In Accounting Date, leave the default date or enter as necessary. This date must fall into an active period for the current calendar for AR.
Click the Review/Consolidate button.
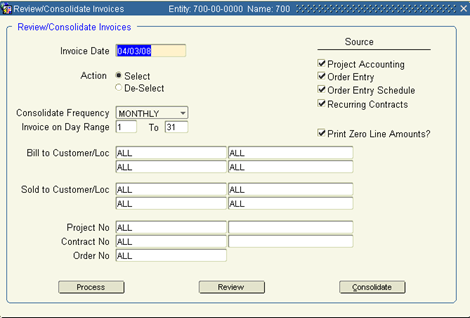
Fill in the fields below as indicated:
Invoice Date |
Leave the default, which is the current date. It's the date that appears on the invoice, and applies to the entire batch. |
Action |
Leave the Select button active. (If mistakes are found during the review process, you may re-process the batch using De-Select. This will remove all previously selected invoices from this batch. It must be done prior to the Consolidate function.) |
Consolidate Frequency |
Leave the default. |
Invoice on Day Range |
Leave the default |
Source |
Be sure each box is checked. Note: If invoicing from multiple sources, you may uncheck the boxes related to sources you do not wish to invoice in this batch |
Print Zero Line Amounts |
Specify whether zero line amounts print on the invoices. By default ‘Yes’ is selected. |
Bill To Customer/Loc |
Default is ‘ALL’ in each field. Delete this if you wish to select a specific customer to invoice. |
Sold To Customer/Loc |
Default is ‘ALL’ in each field. Delete this if you wish to select a specific customer to invoice. |
Project No |
Default is ‘ALL’. Delete this to select a specific Project Number to invoice. |
Contract No |
Default is ‘ALL’ in each field. Delete this if you wish to select a specific Contract Number to invoice. |
Order No |
Default is ‘ALL’ in each field. Delete this if you wish to select a specific Order Number to invoice. |
Click Process. (The system reviews/consolidates based upon those orders processed through the Generate Invoices function.) You will be prompted as to how many lines were selected. Click OK.
Click Review to examine invoices for the corresponding batch.
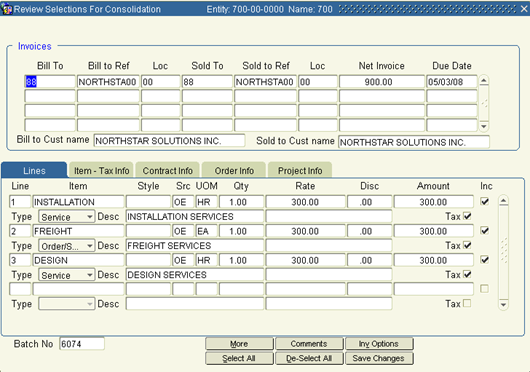
The following information may be modified:
Comments |
Click this box to add comments for a particular line. Multiple lines of comments may be added. |
Inc |
Uncheck this box to hold line items for invoicing at a later time. Note: You must click the Save Changes button to update the record. |
Inv Option |
The invoice options may be updated for the invoice highlighted. |
During the review/consolidate process, you may modify the deposit amount from an order to apply against an invoice. Khameleon will track the remaining deposit amount to apply to the next invoice. During the final invoice for an order, you may not change this amount.
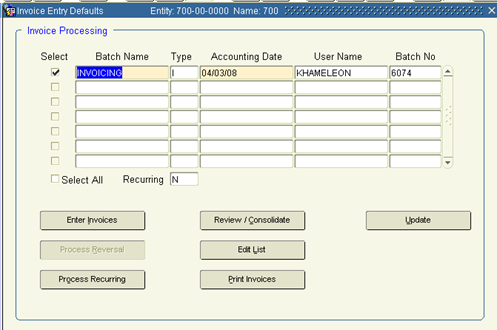
Return to the Review/Consolidate screen.
Click Consolidate to consolidate invoice lines within the specified batch for printing and updating.
(You may NOT modify invoice lines once they've been consolidated.)
You'll receive a message indicating it's ready to consolidate, click OK. You'll be notified that the consolidation has been successfully completed. Click OK.
As part of the consolidation process, the system will create a Cost WIP batch for the line items being invoiced.
Return to the Process Invoices screen.
From the Invoice Processing form, make sure to check the Select checkbox for the batch(es) you wish to print (multiple batches may be printed at the same time). Click the Print Invoices button.
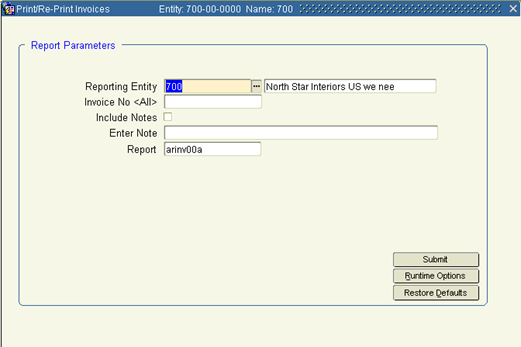
1. Using the fields available, specify which invoice(s) to print.
Reporting Entity |
Your company number. |
Invoice No |
Leave blank for ‘all’. |
Include Notes |
Check this box if you want a note to print on the Invoice. (The note itself will be entered in the next field – see below.) |
Enter Note |
If you checked the Include Notes box, this is where you'll enter that note. Anything you type in this field will print on all invoices selected for this particular printing. |
Report |
Select the appropriate Invoice Style for this printing. Invoices may be printed multiple times using different styles. |
2. Click Submit. You may be prompted that there are unapproved credit memos in the batch you've selected. If so, choose ‘No’ to discontinue the printing, and Approve the credit memos. The system will prompt you that it's about to print the invoices. Click OK.
3. Invoices will be submitted to the report server and appear as a PDF file. You may print, email or save these invoices.
4. After your invoice(s) print, close the PDF document and exit the report submitter.
5. A particular invoice may be reprinted at any time and will have the word ‘Reprint’ on it. If you are reprinting an invoice that has already been updated, you must reprint the invoices from Accounting/ Accounts Receivable/ Processing/ Print/Reprint Invoices. You may enter the invoice number to reprint.
Update invoices
This process assumes the printing of invoices was acceptable. Updating enables you to view detail and summary information regarding the invoices in aging reports and the ‘Customer Balances – Aged’ screen. Once a batch has been updated, you may no longer make changes or print entire batches of invoices. Updating must be performed before data can be updated to the General Ledger.
After you exit the report submitter from printing invoices, you will be returned to the Invoice Processing form.
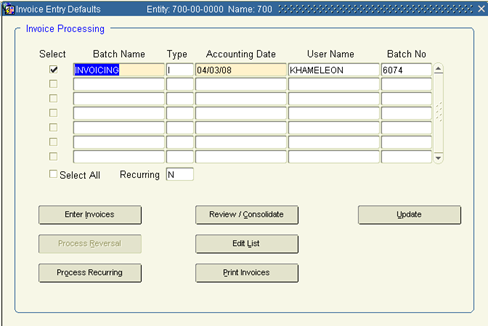
1. Check the Select box that corresponds to the batch number(s) you want to update. (If you're ready to post all displayed batches, check the Select All box).
2. Click Update. The system will notify you that it's about to post the batch you've chosen. Click OK.
3. When the process is finished, the batches you chose will no longer appear in this screen.
4. Exit the screen. The invoices are now ready to post to the General Ledger. The GL Interface Unposted Transaction Detail Report enables you to review the information in an updated AR batch before it's posted to the GL module.