You can set it up so that a certain Order and Pay type used, result and automated processing. Automated processing includes printing the picking ticket, printing the packing list, confirming the shipment, generating the invoice, consolidating the invoices, printing the invoice, updating the invoice and applying cash.
From the Main Menu Go to Distribution\ Order Entry\ Maintenance\ Controls\ Process Control Codes
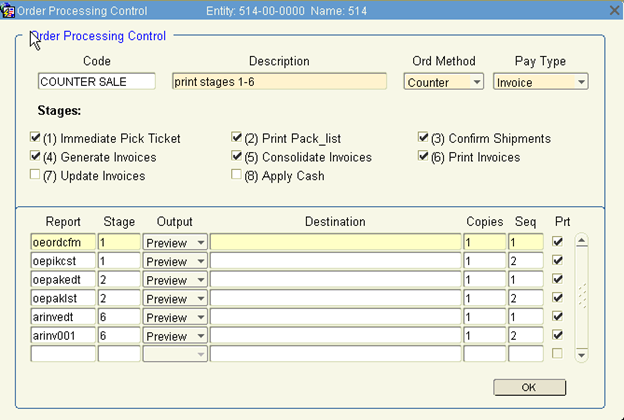
1. Enter a code - a brief name/description for the code.
2. Enter a description for the Code.
3. Select an Order Method.
4. Select a Pay Type.
5. Select the Stages to include for auto-processing with the selected Order Method and Pay Type. Note: Only 1 set of stages can be set up for each combination of Order Method and Pay Type. Whenever an order is created with the selected Order Method and Pay Type the auto-processing will occur.
6. For reports that have more than 1 style, select the report name desired if different than the default.
7. Uncheck the Prt checkbox if you don't want that particular stage to generate to preview.
8. Save and Exit the screen.
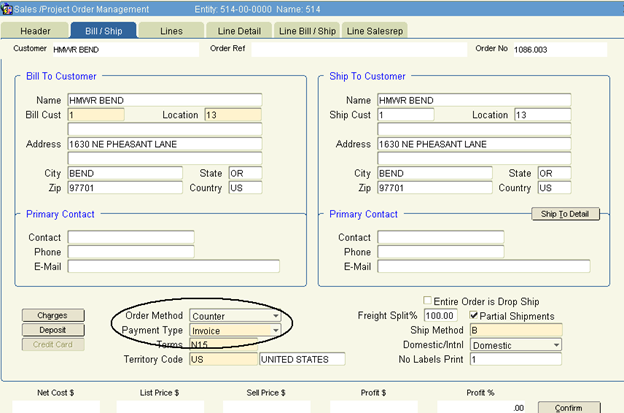
The Order Method and Payment Type for an Order are set in the Bill/Ship tab of the order. So, for the example in the previous screen shot, if you select Order Method of Counter and Payment Type of Invoice, the stages set up in the Counter Sale Order Processing Code will execute when you confirm the order.
If the item is in stock, then the when the order is confirmed, the order confirmation will automatically print, along with the picking ticket and packing list. The Order Fulfillment batch will auto-update. The invoice will be generated, printed and consolidated. Since stage 7 and 8 were not selected, the invoice batch will not update and cash will not be applied.
When you click confirm, a screen will display as each stage occurs and reports print. If the processing is stopped, due to the item not being in stock or a bin needing to be selected, a message will display on the screen.
‘Gross Up’ method
This document outlines the process to set up and process orders in the Khameleon system where a dealership will be recording Revenue and Cost for an order, where the manufacturer will be invoicing the customer directly. The net effect of this transaction will net the revenue and cost of goods sold on the dealerships AR to record what is known as the Dealer Service or Agency Fee.
Milestone/Schedule Codes
Path: Distribution/ Order Entry/ Maintenance/ Codes/ Milestone Templates
Milestones will be used to bypass the entries for Revenue and Cost of Goods sold associated with the line items on an order. Multiple Milestone (Invoice Schedule Codes) may be created if you have multiple, distinct vendors, that you process Direct Bill orders for.
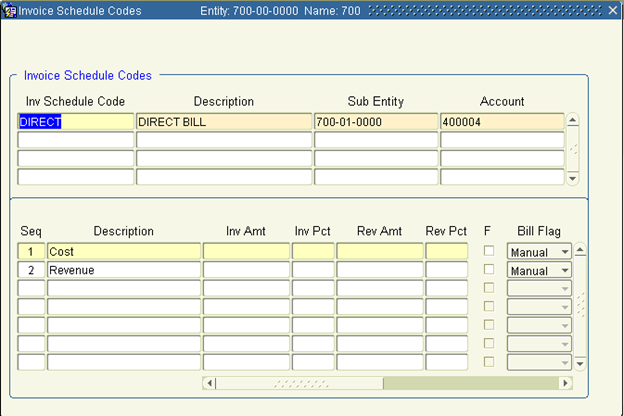
The form is separated in two sections. The top section identifies the code and default information, the lower section establishes the sequence of the codes
Inv Schedule Code Enter a schedule code to be selected by the user
Description Enter a description for this Invoice Schedule Code
Sub-Entity Enter a default Sub-Entity – This will be the Sales Department Khameleon will use to record cost and revenue.
Account Enter either the Revenue or Cost account. This will default at the sequence level and will be overridden when necessary.
Click to the lower section of the form to define the sequence information related to the invoice schedule code being defined.
Seq Enter a sequence number (ie. 1, 2,3). Any starting number may be used for the first sequence, but the next invoice sequence must be greater than the previous sequence number. In a Direct Bill scenario, there will be at least two sequences. The first one will be to record Cost and the second to record Revenue.
Description Enter the appropriate description for the sequence being entered. This description prints on the DSF/Agency Fee invoice.
The following columns should not be modified for code setup:
Inv Amount
Inv Pct
Rev Amt
Rev Pct
‘F’
Bill Flag
Rel
Hold This check box is accessed by moving the scrollbar in the bottom section to the right.Check the box.
Sch Date This is the scheduled date. Do not enter a value.
Sub-Entity This will default based upon the sub-entity entered in the top section of the screen. Override if necessary.
Account For the Cost line, enter the Cost of Goods Sold account required for the entry that will be made. For the Revenue line, enter the Revenue account required for this entry.
If one of these was originally entered in the header section of the screen, only one account will need to be overridden.
NOTE: Multiple sequences within a schedule may be created to make whatever Revenue and COGS entries. When complete, save your entries. You may create as many unique schedule codes as you would like.
Project Order Type Codes:
Path: Distribution/ Order Entry/ Maintenance/ Controls/ Project Order Type Codes
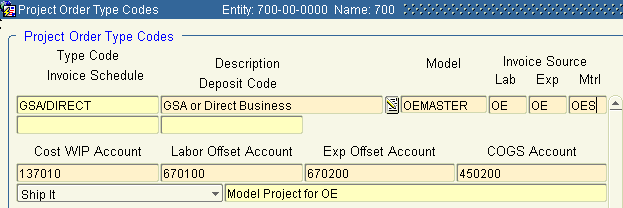
Project Order Type codes are used in the Direct Bill Process to facilitate the ‘Invoice Source’ for the lines on an order. These are based upon the activity type of the item. ‘OES’ should be the value used in the appropriate ‘Invoice Source’. Labor = Internal Service Items, Expense = Subcontracted Services or items like FREIGHT, etc. and Material = Product from Vendors. NOTE: These are default values and may be overridden on a line by line basis, allowing Invoicing via a Milestone for product and invoicing services or other items based upon order fulfillment.
Multiple Project Order Type codes can be created to manage how items are being invoiced. The word ‘Direct’ must be used to facilitate printing PO’s to the manufacturer that reference the ‘Bill To’ as the end customer on those PO’s.
SIF Wizard
In Khameleon, when creating a quote or order for a ‘Direct Bill’ order, the following functions should be used to facilitate correct processing:
SIF File The discounting in your SIF file should represent the Sell price to the end customer. Cost should be calculated so that the margin on the quote represents the Dealer Service/Agency Fee.
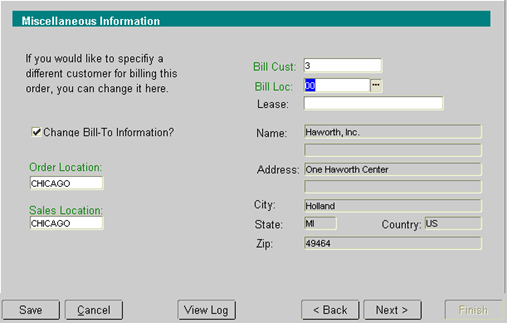
Misc Info Page This form within the SIF Wizard will allow you to select an alternate ‘Bill To’ customer.This is where you would select the manufacturer that is billing the customer directly.This is the customer who's A/R will be affected.
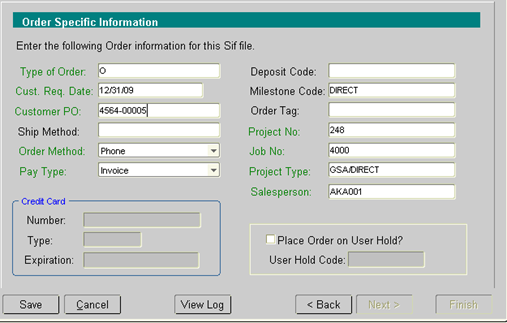
Order Specific Along with the other required information, the following applies to Direct Bill orders: Select the appropriate ‘Milestone Code’ and ‘Project Type’.
Build the rest of the order as per normal.
Order Entry
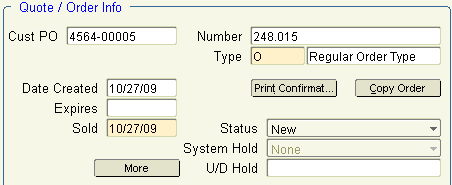
Once the order has been queried, click the ‘More’ button at the header of the order.
This will take you to the ‘Additional Info’ screen. Click on the ‘Milestones’ button to the right of the screen.
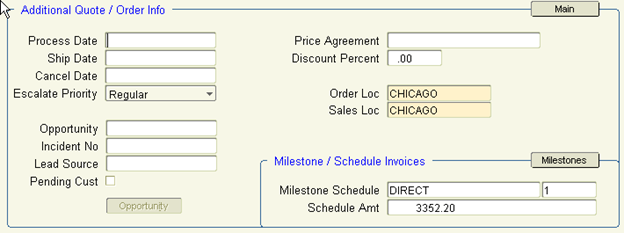
A specific Milestone record has been created for this order.
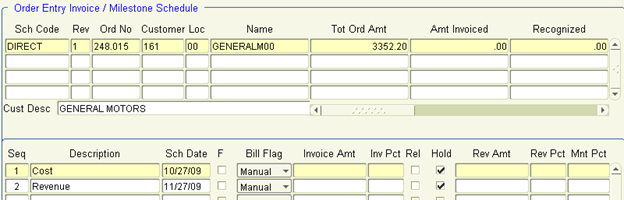
Based upon this order, enter the following information:
Invoice Amt For the ‘Cost’ sequence, enter as a negative amount, the amount of Cost to be associated with this order.
For the ‘Revenue’ sequence, enter as a positive amount, the amount of Revenue to be recognized for this order.
If there are multiple vendors – or revenue/cost sequences, additional lines may be added to this form and accounts entered to the right.
Invoicing
Milestones
From the Order Entry screen, return to the ‘Milestone’ that was created for your order.
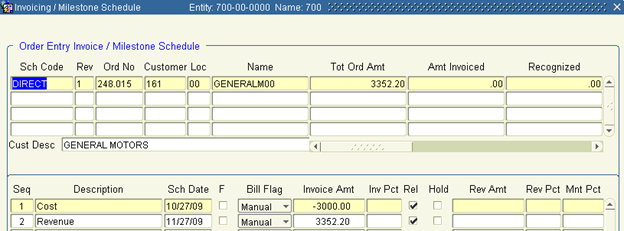
Check the ‘Rel’ or ‘Release’ check-box for both of these line items. Uncheck the ‘Hold’ box if it remains.
Select Orders to Invoice
Path: Distribution/ Order Entry/ Processing/ Invoicing/ Generate Invoices
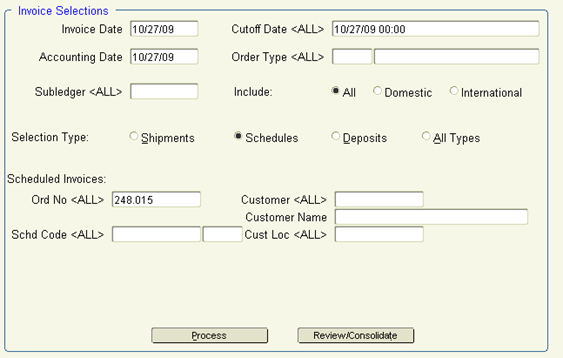
The following options should be used to generate invoices for Direct Bill Orders:
Selection Type Change the radio button to the ‘Schedules’ option.
Order No Enter or select the Order Number you wish to invoice and click the ‘Process’ button.
Follow the normal Invoicing process.