This process is used in Khameleon to complete the following objectives:
● Issue a credit to a customer
● Issue a credit to a customer AND bring product back into inventory OR return it to a vendor
● Bring product back into inventory or return it to a vendor
All the information you should need should be found on the original invoice or delivery ticket/packing list. Having it in front of you will help in this process.
An RMA may be generated any time after a shipment batch is confirmed.
Go to Distribution/ Sales Orders/ Processing/ Returns/ Enter RMA’s
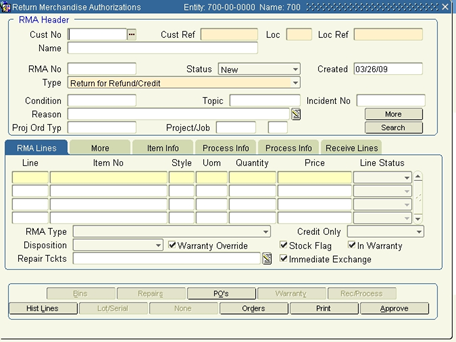
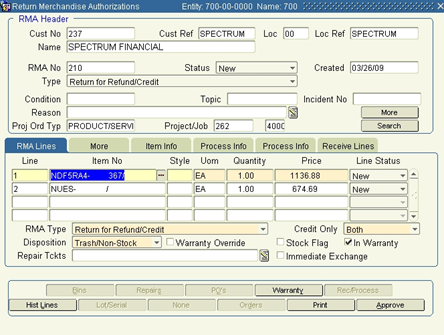
1. Enter RMA header information
Customer No Enter the ‘Sold To’ Customer Number from the Invoice you wish to credit. You may also select based upon Customer Ref. Tab to the next field.
Loc This is the sold-to location number for the customer. It will default to the main location. Change it if you need to. The location reference and Name will display.
RMA No, Status The RMA number is system assigned, bypass this field. The status will be ‘New’.
Created System assigned. The date the RMA is created.
Type Should be ‘Return for Refund/Credit’.
Condition/Topic These are user defined lookups that allow you to track various types of RMA’s.These are not required but may be used when reporting RMA history.
Reason Enter a reason why the RMA is being created.
Proj Ord Type Select, using the list of values (LOV), the original type of order.
Project Enter the Project Number associated with the RMA being generated.
Job Select the job the RMA’d items should be returned to.
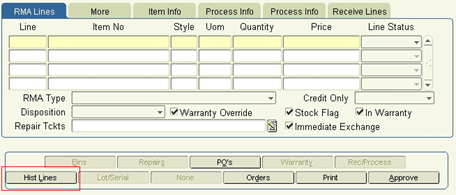
2. Adding Line Items
RMA Items may be manually entered. This process assumes the item(s) originated from an order in Khameleon.
Click the ‘Hist Lines’ button
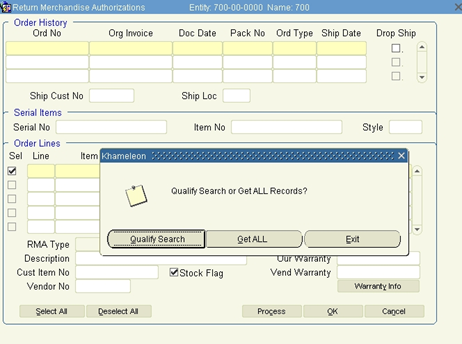
Khameleon places you in query mode. You may use ‘Qualify Search’ to search for a specific order or invoice, execute your query after entering your filter criteria. ‘Get All’ will return all prior shipments/invoices for the customer and location selected at the header.
The data displayed is by ‘Pack No’ or shipment. You may have multiple records returned at the header. The lines shipped and/or invoiced will be displayed below.
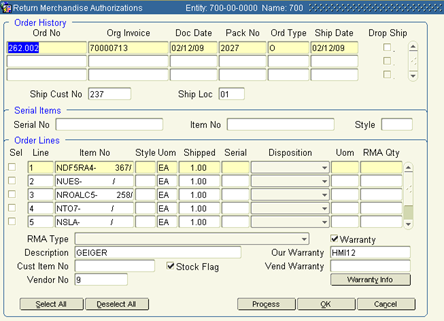
3. Order Lines: Select the lines to be included in the RMA.
Sel Check the box under the ‘Sel’ field to select the line to be RMA’d/ credited.
Disposition Select from the following types (This value must be set for each line item. A system default may be defined. Labor line items should be set to ‘Trash’.):
Return to Vendor: If the product is being returned from the customer and sent back to the vendor, select this option. Khameleon will issue the credit and AP debit memo.
Return to Stock: If the product is being returned to inventory, select this option.
Trash: If you're only issuing a credit to the customer, select this value.
RMA Qty Khameleon will display the quantity shipped/invoiced. You may change the quantity. (You may not change the qty to be greater than the qty invoiced/shipped.)
4. Click the ‘Process’ button, then ‘OK’. Khameleon will message verifying the type of dispositions and that the items have been selected and added to the RMA. Click ‘OK’ to return to the main RMA form.
5. Line items will be displayed with a ‘Line Status’ of ‘New’. The information may be changed as follows:
Price You may change the price. This will be the amount of the credit memo.
Credit Only There are three options:
Both: The product is being returned and the customer is being issued a credit.
Credit Only: If the customer is only being issued a credit and no product is being returned, select this choice.
Stock Only: Use this choice if you're bringing product into inventory, but not issuing a credit to the customer.
‘Credit Only’ is the typical choice when issuing a credit. If product is also being returned, use ‘Both’. Note: When your option includes returning product (‘Both’ or ‘Stock Only’) you may not issue an RMA for those quantities again.
The RMA is now created. Follow the next steps to create your credit memo.
Approval: RMA’s must be approved to process. Click the ‘Approve’ button on the button bar at the bottom.

A message that your RMA has been successfully approved. Click ‘OK’. (Khameleon users are set up with Approval limits. The ‘Approve’ button will be grayed out if the amount exceeds your limit.)
Receipt: RMA’s must be received. Click the ‘Rec/Process’ button on the button bar at the bottom.

Answer ‘Yes’ to the ‘Are you sure message.
Line items may be received individually on the ‘Receive Lines’ tab. Typically all lines are received at the same time.
Click ‘OK’ when prompted with the successful receipt.
Invoicing the Credit Memo: Follow the normal invoicing process. Items are already fulfilled. Begin at ‘Generate Invoices’. Khameleon will process the credit memo as RMA’d.
Type = ‘Return for Refund/Credit’
This document outlines how Khameleon handles different choices in the RMA process. There are three fields found on the RMA lines tab that affect how the RMA is processed. They are:
● RMA Type – There are multiple choices, but we recommend using only ‘Return for Refund/Credit’.
● Disposition – There are four choices:
o Return to Vendor – Use this option if the product will be returned to the vendor. A negative PO is created to allow you to generate a Debit Memo to the vendor.
o Repair - Do not use the ‘Repair’ option.
o Return to Stock – This option will put the returned product into inventory using the cost on the original order. These items can then be pulled from inventory on future orders.
o Trash – Use this option if the product will be thrown away. No inventory or cost transactions are created with this choice. This option can also be used if you physically put the product back into inventory and carry it with no value. Since no inventory transactions are automatically created as part of the RMA process, the items will not be pulled from inventory on future orders (unless you process inventory transactions in the Inventory module).
● Credit Only – There are three choices:
o Credit Only – The system processes only the negative order (used to generate the Credit Memo to the customer) when the ‘Credit Only’ choice is selected. It does not return product to Inventory or create any cost entries. ‘Trash’ is the only valid disposition when using the ‘Credit Only’ option. If you try to use one of the other dispositions, the system will change it to ‘Trash’.
o Stock Only – This choice processes the cost entries to return the product to Inventory (DR Inventory and CR Cost WIP). It also processes the negative order at $0, so no Credit Memo to the customer can be generated. ‘Return to Stock’ is the only valid disposition when using the ‘Stock Only’ option. If you try to use one of the other dispositions, the system will change the disposition to ‘Return to Stock’.
o Both – This choice creates both the negative order to create the Credit Memo, and processes the cost entries required based on the Disposition you choose.
The following chart shows which ‘Disposition’ options are valid with which ‘Credit Only’ options:
Credit Only Option: |
|||
Disposition Option: |
Credit Only |
Stock Only |
Both |
Return to Vendor |
X |
||
Return to Stock |
X |
X |
|
Trash |
X |
X |
|
The next chart shows what the system processes automatically and the journal entries made for each valid choice:
Credit Only Status and Disposition = |
Returning Order – Revenue Entries |
Returning Order – Cost Entries |
Credit OnlyDisposition = Trash |
Reverses the revenue only so a CM to the customer can be generated (at Unit Price). It does not reverse the shipment, i.e. no product is taken back into inventory. |
No Cost Entries |
Stock OnlyDisposition = Return to Stock |
Reverses the Shipment and creates a negative order to record the return of product to the dealer @ $0 (no Credit Memo to the customer will be issued). |
The following journal entry is created to record the product returned to Inventory @ Unit Cost: DR Inventory CR Cost WIP Since no CM to the customer is generated, Cost WIP needs to be cleared manually creating the following journal entry: DR Cost WIP CR COGS |
Both |
Reverses the Shipment and creates a negative order to record the return of product to the dealer @ Unit Price (CM to customer is generated from this order) |
Creates a negative PO for product returned to vendor @ Unit Cost (DM to the vendor is generated from this PO) The following journal entries are made in the PO module: DR AP Accrual CR COGS DR COGS CR Cost WIP When the CM to the customer is generated the Auto Clear Cost WIP process will create the following journal entry: DR Cost WIP CR COGS |
Credit Only Status and Disposition = |
Returning Order – Revenue Entries |
Returning Order – Cost Entries |
Both Disposition = Return to Stock |
Reverses the Shipment and creates a negative order to record the return of product to the dealer @ Unit Price (CM to customer is generated from this order) |
The following journal entry is created to record product returned to Inventory @ Unit Cost: DR Inventory CR Cost WIP When the CM to the customer is generated the Auto Clear Cost WIP process will create the following journal entry: DR Cost WIP CR COGS |
Both Disposition = Trash |
Reverses the Shipment and creates a negative order to record the return of product to the dealer @ Unit Price (CM to customer is generated from this order) |
No Cost Entries |
Examples of when to use which options:
Scenario 1
Situation:
I need to credit the invoice I generated to the customer and re-bill them at a different price. This change has no impact on the cost values.
Solution:
Choose the ‘Credit Only’ option with a Disposition of ‘Trash’. This will create negative line(s) on the original order, which can then be used to generate the Credit Memo to the customer. Copy the lines of the order, make the pricing corrections and generate the new invoice.
Scenario 2
Situation:
My customer didn't like some of the product we installed. I have another customer that wants the product, so I agreed to take the product back and issue them a credit.
Solution:
Choose the ‘Both’ option with a Disposition of ‘Return to Stock’. This will create negative lines on the original order, which can then be used to generate the Credit Memo. The product will be put back into inventory, and can then be pulled from inventory onto a new order for the new customer.
Scenario 3
Situation:
I have product left over from a project that I want to put back into my inventory to be used on future orders. I do not need to generate a Credit Memo to the customer.
Solution:
Choose the ‘Stock Only’ option with a Disposition of ‘Return to Stock’. This will create negative lines on the original order, but they will have a unit price of $0, so no Credit Memo can be generated. The product will be put back into inventory, and can then be pulled onto a new order.
Scenario 4
Situation:
The invoice for the product is correct, but the system charged sales tax because an exemption certificate had not yet been processed. The customer really is tax exempt and we now have the certificate in hand.
Solution:
Choose the ‘Credit Only’ option with a Disposition of ‘Trash’. This allows you to credit the customer (as in Scenario 1). Be sure the exemption certificate is processed before re-issuing the new invoice.
Scenario 5
Situation:
My customer really dislikes the color of the chairs they ordered. The vendor has agreed to take the chairs back. I need to return them to the vendor and issue the customer a Credit Memo.
Solution:
Choose the ‘Both’ option with a Disposition of ‘Return to Vendor’. This creates the negative lines on the order for the chairs allowing you to generate the Credit Memo. A negative PO is also created allowing you to generate a Debit Memo in Accounts Payable to ensure you get the credit from your vendor.